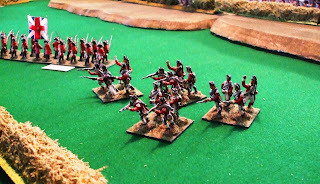
The photo above shows the table from the British viewpoint. Pitzer's Crossing lies in the top left corner and the supply wagons need to leave along the road which leads to the top right corner. The rolling countryside allows for the rebels to place units in dead ground and at the start only two units are visible.
I took the part of Frazer Stewart, the British commander and decided to send Brown's brigade containing grenadiers, skirmishers and a line battalion up the left straight towards Pitzer's crossing, with Able brigade, (three line battalions) pinning the visible Rebel forces. The third brigade, under Carter, contained the artillery and cavalry was on the right and was to act in support of Able. As usual we were using the Patriots and Loyalists rules and each commander had one good, one average and one poor brigade commander. For the British Brown was good, Able average and Carter poor.
The rebel commander had the problem of only one brigade being present and the reinforcements which would arrive would hinder the progress of the supply wagons.
The game began with the British making steady progress towards the first hedge line. On the left, Brown's brigade was making the best speed, with the skirmishers moving through the wooded heights making sure that no rebel riflemen were waiting in ambush. The grenadiers were in column and moving along the road soon reached a position where they could see the area behind the ridge and the Rebel supports. Seeing the rebel units, Brown moved the grenadiers further to the left to protect their flank and moved his line battalion forward support the grenadiers.
On the right, Carter was making hard weather of his advance. The artillery eventually reached the hedge line and began to fire on the rebels in front of them. After a couple of rounds of fire from the artillery, assuming the rebels would be 'softened up', Carter ordered forward the combined light infantry companies. The first volley hit the British as they formed up after crossing the hedge. Ignoring the casualties, the British advanced and were then hit by two more punishing volleys. As the officers tried to restore order a third volley tore into the redcoats and they began to fall back to rally.
In the centre, Able had concentrated the fire of two of his battalions on one of the rebel units. Unable to withstand the volume of fire the rebels fell back to rally, which fortunately, allowed Able's third battalion to support Carter whilst the light companies were out of action. However, Able's advance was slowed by the appearance of a third rebel unit at the hedge line. Again, volleys were exchanged, but the heavier British fire eventually forced the rebels back.
Brown's skirmishers had by now almost reached Pitzer's Crossing. They could see the flurry of activity as the wagons began to move, made worse by the arrival of Bannister's brigade of militia infantry along the road the wagons were trying to use. Bannister's riflemen reached the outskirts of the village just in time to oppose the British advance. They were quickly followed by two more militia units and the British would now need to fight their way in. The grenadiers stepped forward with confidence, supported on their left by the skirmishers they closed on the defenders. Their mood was shattered by fire from front and flank and they were forced to fall back to rally. A second advance cleared the flanking militia battalion, but further progress was again stalled by musketry from the rebels.
Arnold Benedict, the Rebel commander was relieved to see the arrival of Cowman's brigade of Continental infantry to support Archer's battered brigade. Archer had managed to hold the hedge line in front of the second ridge, but he was coming under severe pressure.
By the road the British pushed forward. The rebels fired two volleys as the British advanced, but undaunted the line of bayonets continued to move forward. As the lines came closer nervous glances were exchanged by the rebels and then they routed.
A crisis had been reached. Benedict had only one unit between the British and the wagons. If that failed to halt the enemy advance, the day was lost. Fortunately, that one rebel unit was the combined light infantry companies. Cowman rode forward, and ordered the light infantry to advance. This they did then halted and fired a volley. The British were caught reforming and the casualties caused them to fall back to rally. British morale was by now reaching a critical level. All the brigades had lost heavily and Stewart recognised that only one more effort could be made. Brown and Carter were to hold their positions whilst Able made one more push. His battered battalions moved over the second ridge and could see the wagons on the road. Only two battalions opposed them and one was driven off by musket fire. However, the second stood its ground. Able found that any further advance would put his flanks 'in the air' and had to settle for a musketry duel. Stewart galloped forward to join Able and arrived just in time to see the last wagon disappear down the road.
This was an excellent game which swayed one way and the other. The rebels did extract the wagons, but two of their brigades were severely damaged and they had few leadership points left to keep the brigades in the field. For the British, they too were severely weakened. the successive defence lines of the rebel position had given them the time they needed to remove the wagons and also bring their reinforcements into the line. The leadership points rules, which we were using for the first time, added another dimension to the decision making by the commanders.


No comments:
Post a Comment