Saturday 2 March 2024

Catlow's Worth; A Kelhamshire Scenario for Pike and Shotte

The third installment of the mini campaign to raise the siege of Edgerton House is set at Catlow's Worth.  A 'worth' is an old Kelhamshire word for an enclosure; and the enclosures owned by Richard Catlow figure prominently in the action which follows.

Following Sir Victor's failed attempt to raise the siege of Edgerton House, he was falling back to a more secure area.  However, Lord Melchett was not willing to let his old adversary 'off the hook', and was prosecuting a vigorous pursuit.

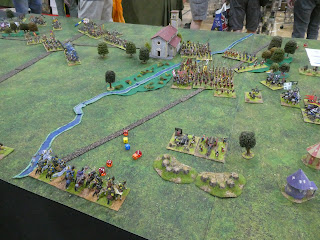
View along the battlefield, the Parliamentary army will
 take up a position on the right of the picture

View from the Royalist start line
Sir Victor has 4 units of foot, 4 of horse, a unit of dragoons and a light gun.   Sir Victor has ordered Colonel Robinson to deploy the cavalry on the right of the line and Colonel Wanless to occupy the fields (Catlow's Worth) and cover the road .  The dragoons were ordered to the left to cover that flank.  

Robinson's cavalry

Bentham and Ireby's regiments still moving towards their positions


Mytton , Leck (blue flag) and the artillery  moving into position


Parliamentary dragoons

 In addition to his Lifeguard. Lord Melchett has 4 units of cavalry and a unit of dragoons with Sir Royston a Dammes,  3 regiments of foot and a unit of commanded shot and lagging some way behind, two medium guns.
Lord Melchett deployed his cavalry on the left with the foot on the right together with Lord Melchett and his Lifeguard.  Sir Royston wasted no time in sending the dragoons forward to occupy the woods by the road junction and bring the leading Parliamentarian cavalry unit under fire.  Once the dragoons had begun to move into the trees he sent his largest unit, Ashton's, forward .  He also sent Bracewell's regiment towards the left to pin the Parliamentarian cavalry positioned behind the stream.  De Lisle's and Catlow's regiments were held in reserve.  Meanwhile, Nicholls had ordered the commanded shot forward into the woods near the enclosures and Clifton and Bradshaw's regiments to advance between the woods and the road.  Lord Melchett moved to the right with his Lifeguard and Smethurst's regiment.


The Royalist cavalry and dragoons


The Royalist foot with Lord Melchett and his Lifeguard

The action began with a clash between  the regiments of Ashton and Thursby.  A protracted melee resulted in both units having to withdraw to reform and recover.  However, Sir Royston had the advantage of having units available to exploit the situation, while Robinson's other regiments were on the other side of the stream and risked disorder crossing it to engage the enemy.  

Thursby's and Ashton's regiments clash
Sir Royston ordered De Lisle's regiment forward and they crashed into Thursby's regiment while they were still recovering.  It was all over in the blink of an eye and Thursby's were soon routing back along the road.  Sir Victor galloped over to try and stem the rout, but was swept from the field in the maelstrom of horses and riders.

Thursby's broken by Bracewell's fresh regiment 


Sir Victor fails to stop Thursby's rout
De Lisle didn't pursue his beaten opponent, but paused to reform.  This proved to be a costly error as  they suffered significant casualties from a salvo from Bentham's regiment and were then charged by Bannister's regiment of horse.  This forced the Royalists back and for a time peace returned to this area of the battlefield.  In the enclosures matters were coming to a head.  

The Parliamentarian foot and artillery had been slow to take up their positions, particularly Leck's regiment nearest the road.  To their left, Mytton's regiment had been engaged in a musketry duel with the commanded shot and had the worse of the encounter, though their greater stamina had allowed them to continue firing while the Royalist musketry had slackened.

The Royalist's advance on the enclosures
To the left of Mytton the dragoons were firing at Smethurst's regiment which was advancing towards them.  Heavily outnumbered the dragoons had little chance of holding their position, and if they fell back it would create a gap which could be exploited by Lord Melchett's Lifeguard.  The colonel of Mytton's regiment saw the threat and decided to redeploy his regiment to face the left and fire into the flank of the Royalist infantry.  This unexpected order caused confusion within the regiment and the manoeuvre was much delayed.  Seeing the confusion, the commanded shot seized their chance and moved quickly to the recently abandoned hedge of the enclosure from where they were could fire into the flank of Mytton's regiment.  In the event, the Parliamentarian manoeuvring  had been unnecessary, as Wanless had ordered his reserve regiment, Ireby's, to move to the left to assist the dragoons.  In the end, Mytton's regiment had to fall back out of the enclosure and defend the hedge there. 


The Royalists charge home
In the right hand enclosure battle had been joined.  Leck and the artillery had the opportunity for only one round of firing before the Royalist regiments charged home.  The gunners decamped almost immediately, leaving their gun and heading homewards.  Leck's regiment held back the more numerous Clifton until Bradshaw's regiment crossed the hedge and threatened their flank.  As the Parliamentary infantry edged back, a final push from Clifton routed them.


Ireby had arrived in time to see Smethurst's regiment push back the dragoons.  He charged the Royalists, but got the worst of the encounter and had to fall back to reorganise.  Sir Victor returned to the battlefield to find that three quarters of his infantry were falling back, his artillery had been abandoned and that his cavalry were heavily outnumbered.

In the distance he could see Sir Royston readying his regiments to exploit the disorder in the Parliamentary forces so he ordered Robinson to disrupt any threatened attack.  Robinson had only two weak regiments available, but he did what he could.  Kippax's regiment was sent across the ford to attack the flank of any attack along the road and Bannister's regiment moved up to block the road itself.  Meanwhile Sir Victor  and Wanless were doing their best to rally and then shepherd their battered infantry from the field.  

Sir Royston launched Ashton's regiment forward to complete the rout, with his other regiments moving forward in pursuit.  Robinson's units attacked the much larger Ashton but could do little to slow the advance.  It was left to Bentham's foot to try and hold off the pursuit.  Night saved them from total annihilation , but they paid a heavy price.

Lord Melchett was pleased with his victory.  Taken together with the capture of Edgerton House, the campaign could be seen as a success.    Sir Victor had been giving a thorough drubbing and there may be opportunities for further gains while the Parliamentary forces reorganised themselves.His one concern was the artillery.  It had taken far too long to get to the battlefield and paid little part in the action.  If only he could get it to be more mobile.

Tuesday 13 February 2024

Raising the siege of Edgerton House: an ECW Kelhamshire scenario for Pike and Shot

 Lord Melchett's and Sir Victor Meldrew's struggle for control of Kelhamshire continues to generate interesting battles.  This, the latest installment, is part of a mini campaign where Sir Victor is attempting to raise the siege of Edgerton House.  Edgerton House is owned by Sir William Edgerton, a staunch supporter of the Parliamentary cause.  He has used his home as a base to raid nearby Royalist areas and generally be a thorn in the side of Lord Melchett.  Having had enough of the troublesome Sir William, Lord Melchett has besieged Edgerton, entrusting his senior engineer Jakob Van Oord, with the technical aspects and Sir Harvey Nicholls with the military prosecution of the siege.  Sir Harvey has three units of foot plus a unit of commanded shot.   Van Oord's artillery consisted of 2 medium guns and a mortar and these were beginning to seriously damage the defences of Edgerton House.  Sir Harvey had sent his only unit of horse off on a scouting/foraging mission.

Sir Victor is determined to come to the aid of Sir William and has gathered a force to relieve Edgerton House.  In an earlier action, Lord Melchett had tried to intercept Sir Victor's force, but had been unsuccessful.  This means that Sir Victor is now approaching Van Oord's siege lines and Sir Harvey is going to have to hold off the attackers and hope (pray?) that help comes in time.

View of the table, with the Royalist siege lines on the left

Sir Victor's force consists of 4 units of foot, 2 light guns and 4 units of horse plus a unit of dragoons.  The foot and artillery were under the command of Colonel William Wanless and their advance was preceded by the dragoons.  The cavalry were advancing on another road to avoid congestion.  Their commander, Sir Andrew Goldshaw had been injured at the earlier action and command now fell upon the relatively inexperienced Colonel Edward Robinson.  Sir Victor was accompanying the foot, urging them forward at their best pace.

As the infantry column advanced along the road, Sir Harvey's cavalry appeared on their left.  Sir Victor anxious to secure his flank, took command of one Colonel Wanless's regiments and led it to the left to face the enemy cavalry.  Meanwhile, the Parliamentary horse had arrived and were moving quickly towards the enemy siege lines.

Sir Victor supervising the advance of his infantry

Sir Harvey was having difficulty getting his men to face the threat to their rear.  One unit misheard the order and instead of about facing, moved towards Edgerton House.  Others struggled to manoeuvre within the siege lines and only the commanded shot responded quickly.  Van Oord was somewhat reluctant to move his guns, but the mortar responded fairly quickly and was soon lobbing shells (or bombs) at the advancing Parliamentary troops.

The Royalist siege lines

The advance of the Royalist commanded shot convinced Colonel Robinson he should attack and he pressed forward to gain room to deploy.

The Parliamentary cavalry advance

It was at this juncture that Sir Roystron A'Dammes and Lord Melchett appeared with a brigade of Royalist cavalry and a unit of dragoons.  Lord Melchett sent the dragoons to his right to harass the Royalist cavalry still in column on the road and then Sir Royston led the cavalry towards Edgerton House.
Sir Royston arrives with the Royalist cavalry

Colonel Wanless had ordered the dragoons to line a hedge and dissuade the Royalist cavalry foragers from approaching the infantry column.  His main concern however, was the road junction ahead, where the columns of infantry and horse were both trying to get forward.


The dragoons cover the flank


The log-jam where the roads meet

The leading Parliamentary cavalry regiment had deployed and charged the commanded shot.  The second regiment had deployed and moved against the returning foragers.  Against the odds, the commanded shot repulsed the Parliamentary cavalry, forcing them to retire in disorder.  The second regiment had more success against the returning foragers.  The Royalist horse were driven back towards the siege lines, but the Parliamentary horse did not follow up  and consequently suffered heavy casualties from musketry fire from the Royalist infantry which had at last sorted themselves out.

Sir Victor was still leading his infantry regiment around to the left to bring it onto the hill close to the Royalist siege lines, but poor going made for slow progress.  Sir Harvey ordered the commanded shot into the woods flanking the road the cavalry were advancing along.  To make matters worse, the dragoons also moved to a position flanking the road.  Colonel Robinson pulled back his horse regiments, leaving room for Colonel Wanless to deploy one of his regiments to attempt to drive off the Royalists.  The Parliamentary light guns also deployed to add their firepower.

Lord Melchett had taken his Lifeguard of Horse to the left to try and add further to Colonel Robinson's woes, but Robinson had a unit in reserve and this moved to counter the Royalist attack.  A prolonged melee ensued with the initiative passing back and forth and resulting in both units having to fall back to recover.

Wanless had ordered the dragoons to move to the woods on the left of the infantry on the hill and had also sent a second unit to join the one which was already established there.  It was at this point that Sir Royston arrived in the centre with his cavalry.  His leading unit deployed and then charged up the hill to attack the Parliamentary infantry.  An ineffectual volley failed to stop them and the cavalry charged home.  Try as they might the Royalist cavalry couldn't break into the infantry formation and had to fall back to recover.  As the Royalist cavalry fell back, the Parliamentary infantry were subjected to fire from the Royalist artillery and foot.


The Parliamentary foot began to waver, even though they now had supports.  Sir Royston decided to try again.  Gathering another regiment of horse he charged up the hill again.  Even though they were now shaken and disordered, the Parliamentary foot held their ground and delivered a volley which stopped the charge in it's tracks.


Meanwhile Colonel Wanless was trying to push back the Royalists lining the lane.  The fire from the light artillery was having little effect against the dragoons and so he ordered a charge.  Naturally, the dragoons evaded, but did not move away quickly enough and they suffered heavy casualties as the foot fired a volley to hurry them on their way.

Wanless orders an attack on the Royalist dragoons

The Royalist artillery, ably directed by Van Oord, targeted the Parliamentary infantry and soon reduced one gun to a heap of wood and metal.  Desperate to save his other gun, Wanless ordered it to pull back, which meant that the Royalists now turned their fire on Robinson's cavalry.  Suddenly there was a loud explosion and the mortar exploded, killing its crew and the hapless Van Oord who was directing its fire.                                      


From his position on the hill near the siege lines, Sir Victor decided that further progress was going to be difficult.  He would need time to clear the commanded shot from their position in the wood and any attack by his horse or foot would be in the teeth of artillery and musketry fire.  Also, Sir Royston still had the advantage in numbers of horse, in spite of his losses.  Summoning one of his staff he ordered them to find a couple of volunteers to try and break through the siege lines and inform Sir William that he, Sir Victor, was having to pull back the army and that he should seek terms from Sir Harvey.

For his part Lord Melchett was keen to harass Sir Victor all the way back to his base and set about organising a vigorous pursuit by as many men as Sir Harvey and Sir Royston could spare.

Tuesday 6 February 2024

Vapnartak 2024

It was an early start on Sunday as we set off over the Pennines to York for the Vapnartak show.  Will had organised the Lance & Longbow participation game for this event and he opted for the battle of Montgisard set in the Holy Land in 1177.  Will used 20mm figures and this allowed him to field larger armies and make the game a bigger spectacle.

The centre and left wing of the Saracen army, with the baggage train strung out behind it.


Two units from the Frankish army 

Will's scratch built Saracen camp

The game ran three times during the day with victory going to the Franks on each occasion, but with one close result.  Members of the public took part in each game and plenty of people stopped and asked questions.

Other games on offer included

Gripping Beast with their Ecorcheurs game


At the far end of the 2nd Mezzanine was Ken (Yarkshire Gamer) Riley's Battle of Mentana game from the wars of Italian Unification.  The location of the game meant that you could only take photos from one side and that was against the light.  I feel a game like this should have been in a more prominent position, giving people a chance to appreciate it from all sides.


Also on this floor was Sally Forth with their Pulp Action Venice game.


A beautifully presented game with plenty of people to explain the mechanisms and also the modular buildings which allow for various  roof designs.

The Harrogate club had a 'Kiss me Hardy' game


It was very busy in the morning, but as usual numbers eased in the afternoon.  Our society stand had a good day, selling about £100 of books and flag sheets.  Will, Andy and Steve ran the game and Andy also provided some much needed refreshment during the day.  Rhankyou to all the members of the public who joined in the game and made it such a success.

For more pictures/comment you can look at Will's blog here, or Andy's blog here.  Video reports can also be found on youtube.


Monday 29 January 2024

Prelude to Vapnartak 2024

 This coming Sunday, the wargame amateur show calendar creaks into motion once again with a trip to York for the Vapnartak show.  Once again the Lance & Longbow Society will be present with a stall of society publications and a participation game.  This years offering is a scenario based on the battle of Montgisard in 1177.  The game has been devised by Will, so I don't have any pre-show photographs.  If you are attending the show you are most welcome to drop by and chat, perhaps even roll a few dice.

My apologies for the almost 2 month break in posts, life and a departure on holiday of the 'literary muse' are the main culprits.  We have been meeting regularly for games, but I just haven't got around to reporting them.  All being well, normal service will resume.


A shot from a WSS game in January.  The Allies were attacking the flank of the French line and two dragoon regiments are trying to hold the hedge line. 


Monday 4 December 2023

RECON at Pudsey

Initially the show was cancelled as the club was having difficulty finding someone to organise it, however, Matt from the Pit Gaming Shop stepped in to take over.  So, on a cold and frosty morning we set out over the Pennines to Leeds.  The tables and chairs were all set up when we arrived so setting up our game was straightforward.  Once the doors opened, it wasn't exactly a flood of people coming in, but sufficient to give a good atmosphere.  A reasonable spread of traders were present and they seemed to be busy in the morning, but after lunch the usual decline set in.

We were putting on our usual 'Lion Rampant' participation game, this time a fictional clash from the 1396 Danube Crusade, which ended in the crushing defeat of the Crusader forces at Nicopolis.

Let battle commence: Crusaders on the right

In the first game the Crusaders struggled against the Ottoman centre and although they did some damage, the Ottoman archery was effective in whittling the knights numbers down before they were able to charge into melee.  The Crusader left also fared badly and by the close of the first game...

All that remained of the Crusader centre, about to be encircled

The mounted knights and men at arms had been wiped out and only the foot knights remained and they faced four Janissary units.  Losses on the flanks took the total of lost units to 8 and with over half of the army lost the Ottomans claimed victory.

After lunch we played through again and once again the knights fared badly.  Even though they were only required to achieve a score of 3+ on two d6 they still contrived to fail a morale check and had to fall back.  Coupled with repeated failures to charge (5+ required on two d6), they suffered from the repeated showers of arrows.  Nevertheless, with defeat seemingly inevitable, a last desperate  charge by the men at arms managed to inflict a casualty on the Sipahi of the Porte, who were led by the Ottoman army commander.  There is a chance of killing  a general involved in melee (double one is required on two d6), the Crusader player rolled the dice... double one.  Victory dragged from the jaws of defeat!!

During the lunch break I managed to have a look at two nearby games.

Peterborough Wargames "What a Pirate"


   These were taken before the group re-set for a game in the afternoon session.

East London with two games using the "Emperor of the Battlefield" rules 


Many thanks to Andy, Bob, Steve and Will for helping with the game and to John, a willing volunteer who tackled our version of 'Lion Rampant'