Friday 28 May 2021

Ober Bruchberg; a Napoleonic scenario using the Shako rules

 The last time my Napoleonic troops were on the table was nearly 18 months ago, a long gap and mainly attributable to the COVID restrictions.  When Steve and I got around to organising 'skype' games it became clear that with the avaliable cameras 15mm figures were too small to use and we therefore concentrated on our 25mm collections.  However, this week, with restrictions relaxed we were able to meet up indoors again and so I dusted off the figures and set up this scenario.  

It is set in the Isar valley during the 1809 Danube campaign.  Rosenburg's Corps is attempting to hold the line of the Isar and cover the flank of the main Austrian army in the Danube valley to the north.  Mouton's corps is marching towards Ober Bruchberg, hoping to seize the bridge and then move north.  Rosenberg has chosen to use the hills on the western bank for his defensive position.


The Isar can only be crossed at the bridge or the ford, the stream flowing into the Isar can be crossed by infantry and cavalry, but artillery must use the ford.  To the north and west of Klein Sandling are woods which reduce formed infantry to half speed and are impassable to cavalry.  The swampy ground from which the stream flows is impassable to all troops.

Rosenberg deployed Bartenstein's infantry division on the hill to the south of Ober Bruchberg with one battalion, 1st battalion Deutschmeister, in the town itself.  Mohr's infantry division was on the hill to the north of Ober Bruchberg and Frimont's infantry division was in the area beyond the stream of the Isar.  Nostitz's light cavalry division was placed in reserve on the eastern bank of the Isar, able to move north or south as required.  Rosenberg's plan was for Mohr to hold the hill to the north of Ober Bruchberg, Frimont to advance onto the high ground and then swing south-west to the line of the stream and threaten the flank of any enemy attack from the direction of Klein Sandling..  Nostitz was to move onto Frimont's left flank and pose a similar threat.  If circumstances permitted, Bartenstein was to swing his left flank north-west to threaten the flank of any direct attack on Ober Bruchberg.

Mouton had the infantry divisions of Franquement (Wurttemburg) and Deroy (Bavaria and Baden) deployed on the line of the road south from Klein Sandling.  Franquement, on the right, was to attack and seize Ober Bruchberg.  Deroy was to attack Mohr's position and pin him in place.  Sevdevitz's light cavalry division, which was deployed behind Franquement and Deroy, was to move south to support Franquement's right wing and threaten any infantry advancing from the hill to the south of the town.  On the 'French' left, Fontanelli's Italian division was only just arriving.  It was to pass to the north of Klein Sandling and attack Mohr's flank with one brigade and use the other to hold the line of the stream.

Preceded by artillery fire, the French attack moved forward.  Initially good progress was made, but Mouton's divisional commanders soon began to face problems.  Franquement had to move one brigade to his right as Bartenstein's  leading battalions moved off the hill towards him.  Sevdevitz's light cavalry took their time moving onto his flank and meanwhile a lively battle had erupted between the rival skirmisher screens.

The French left: Deroy ready to advance and Fontanelli just arriving

The French right: the skirmisher screens come in range

In the centre, Deroi's advance began to break up.  The Bavarian brigade continued towards Mohr, but the Baden brigade halted.  If they advanced further they would be threatened by Nostitz's light cavalry which was massing just beyond the stream.  The plan had called for Deroy's flank to be covered by Fontanelli, but he had run into problems.  

The Klein Sandling bottleneck

The gap between Klein Sandling and the woods  was narrow so Fontanelli continued to advance in column.  However, Frimont had rushed forward his artillery and the columns were in effective range and suffered severe casulaties as they moved forward.  The Austrian skirmishers also made a nuisance of themselves and the Italians deployed into line, slowing their advance.  Encouraged, Frimont now advanced his line battalions onto the hill and then down towards the stream, flanking the Italians.  The leading brigade moved left to meet this threat, slowing the advance of the second brigade which was supposed to be helping the Badeners. 

Nostitz's cavalry preparing to move across the stream


Deroy's advance

Franquement advances with cavalry support

Frimont launched the Stipcisz Hussars against the Baden brigade anticipating that this would force them to form square and provide juicy targets for the Austrian artillery.  In the nick of time a column of Italian infantry moved up on the flank of the Baden Gross Herzog regiment and enabled them to remain in line and deliver a closing volley into the charging hussars.  This emptied a good number of saddles, but not enough to stop the horsemen charging home.  The infantry managed to hold their ground and repel the light cavalry, but this would not be the only charge the Badeners would face.
The Stipcisz Hussars charge home


and are driven off
On the French right Franquement's attack on the hill was not making much progress.  The Austrian Zach infantry regiment had formed square when Sevdevitz's cavalry had moved forward, but the Wurttemburg horse artillery had been unable to disorder the square sufficiently for the cavalry to charge forward and finish the job.  Realising time was slipping away, Franquement ordered the 2nd battalion Prinz Paul regiment to charge the Austrian square supported by the Italian light horse.  The result was a bloody shambles.  The joint attack was driven off with heavy loss, the Italian cavalry lost half their strength and the infantry were so weakened they played no further part in the battle.

Zach stand firm
Deroy's Bavarians were now in position to assault Mohr's position on the hill.  Their skirmishers had been picking off the artillerymen manning the Austrian guns and although Deroy's artillery had had to re-deploy to face the threat from Nostitz's cavalry the Austrian infantry battalions in the front line had been weakened in the earlier bombardment.  To try and disrupt the attack Nostitz advance the Schwarzenberg Uhlan across the stream.  Here they came under fire from Deroy's artillery, suffering quite heavy casualties and instead of continuing against the Bavarians they swung right and charged the Baden brigade.  Once again it was the Gross Herzog regiment which came under attack and once again they drove off the cavalry.

Along the stream Fontanelli was coming under increasing pressure.  Perhaps sensing that the Italians were on the back foot, Frimont ordered his infantry to attack.  The 4 battalions on the 4th and 5th line regiments suffered particularly badly, two being driven from the field and a third suffering heavy casualties
Frimont moves forward

Glancing to his right, Mouton saw that Franquement was closing in on Ober Bruchberg.  After an artillery bombardment the 1st battalion of the von Neubronn Fusiliers charged the village.  The defenders, 1st battalion Deutschmeister repelled this attack and also one by the 2nd battalion von Neubronn.  As the Wurttemburger infantry formed up to attack again, Sevdevitz took matters into his own hands.  To the south of Ober Bruchberg, between the village and the hill, 3rd battalion Deutschmeister had stood firm under artillery fire and also an attack by the 2nd battalion Kronprinz regiment.  Behind them, the battalion of landwehr from the Salzburg district had also suffered losses from the artillery.  Both battalions looked as if they were wavering.  Sevdevitz ordered the Cheveauleger Prinz Adam to charge.  As the cavalry surged forward Deutschmeister began to form square.  Perhaps due to officer casualties this was not carried out as efficiently as usual and before the ranks were formed the cavalry were among them.  In no time the square was swept away and the survivors sought sanctuary in the village.  

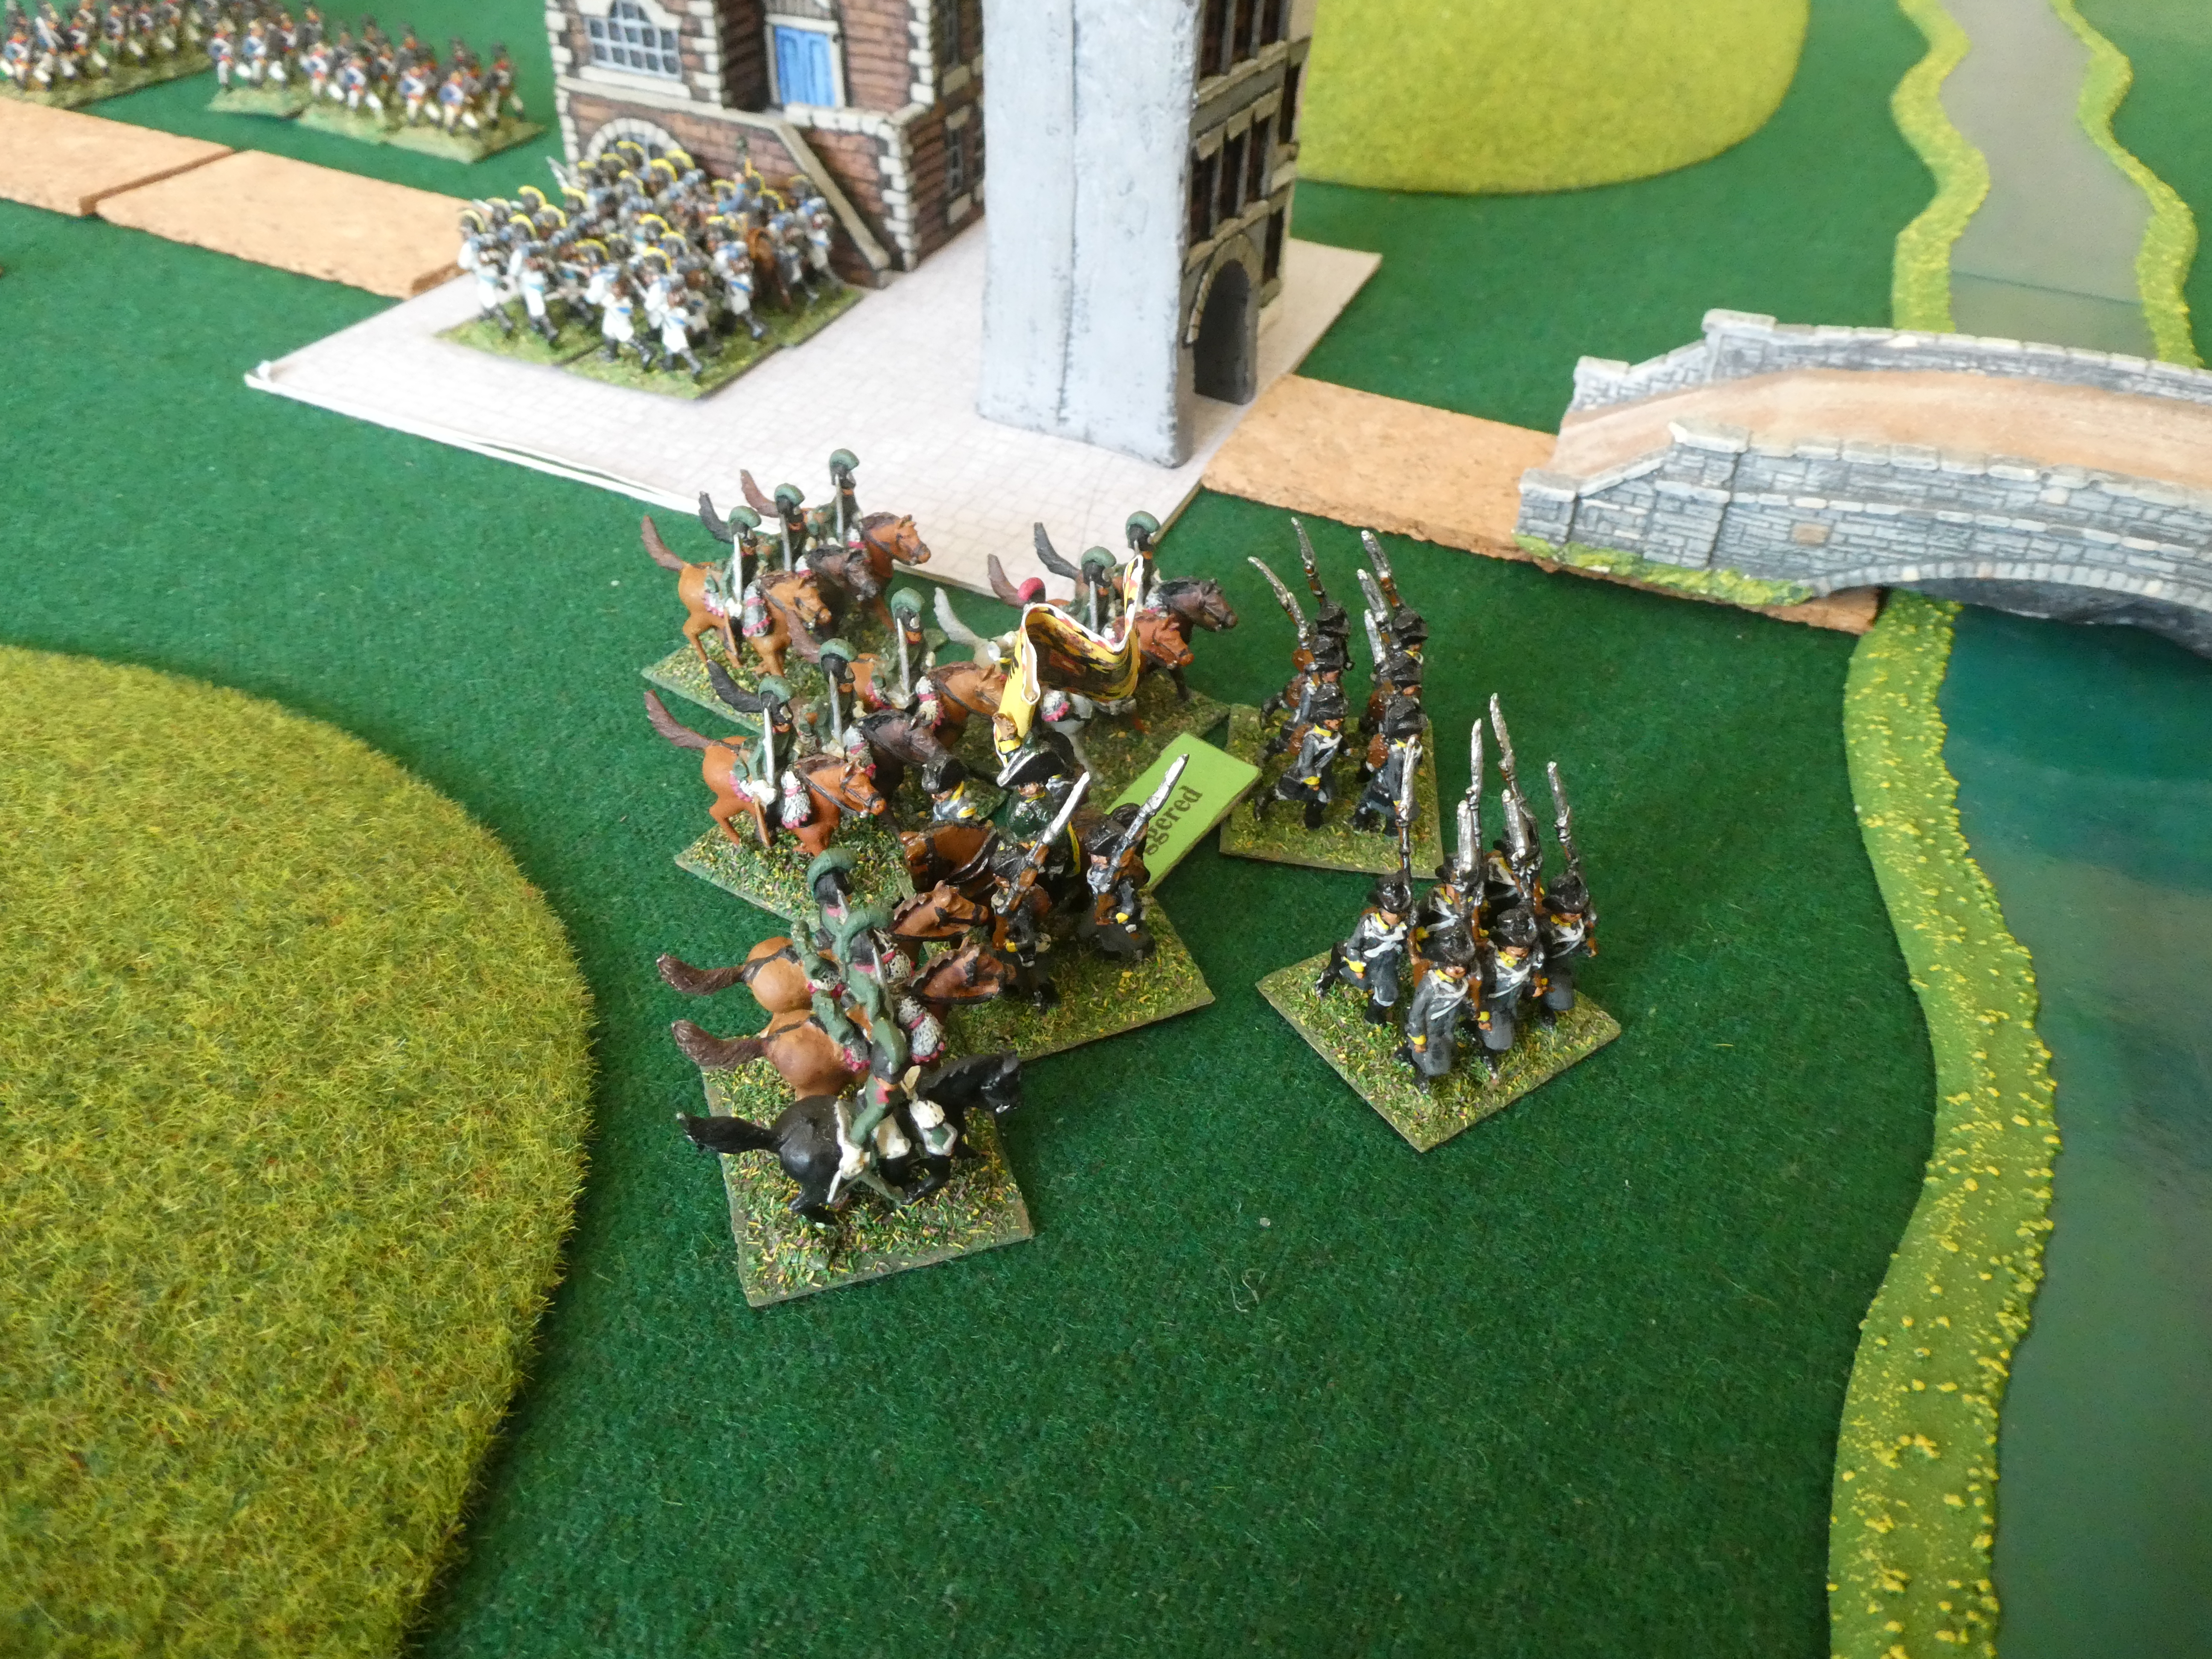
3rd battalion Deutschmeister disintegrate

Nearer the river, the Landwehr looked on in horror as the regular line infantry scattered and the Wurttemburg cavalry followed up in their direction.  All cohesion seemed to evaporate and they were swept away by the cavalry.

The Landwehr suffer the same fate

This success was in vain.  Deroy's attack had stalled.  The Bavarians, faced with resolute Austrian infantry to their front and cavalry on their flank, were forced back.  Deroy's other brigade was unable to help and the Italians were fully occupied trying to prevent Frimont breaking through their lines and seizing Klein Sandling.

Mouton had little option but to recall Sevdevitz and Franquement and order them to help Fontanelli hold Klein Sandling and the lines of communication back to the Danube.  Deroy's orders were now to hold the centre as long as he could.  There would be no crossing of the Isar today.

A satisfying game, with both commanders able to take positives from the action.  I was happy that even after such a long break we managed to re-acquaint ourselves with the rules quickly and the game flowed well.  Congratulations to Steve for his stout defence.


Sunday 16 May 2021

Little Easing, (or did you ever have one of those days): an ECW scenario for Pike and Shotte

We return to Kelhamshire for our game this week and the continuing struggles between Sir Victor Meldrew and Lord Melchett.  Once again it is caused by search for quartering areas for their troops.  Up to now the area around the river Dash has been fairly quiet but that is about to change.  Sir Victor had hoped to be across the Dash before Lord Melchett's forces were alerted, but that was not to be.  As his vanguard formed up to cover the bridge, scouts reported enemy forces beyond the small village of Little Easing.

The battlefield from the Royalist position

There are only two viable crossings of the Dash, the bridge and an abandoned ford.  The latter may disorder units using it.  Forces were fairly evenly matched;  both had 1 large and 2 standard sized cavalry regiments and a standard sized dragoon regiment.  In addition the Royalists had 2 small regiments and the Parliamentarians 1.  For foot, both had 1 large and two standard foot regiments, though the Parliamentarians had a slightly higher percentage of musketeers and an extra unit of commanded shot.  Both sides had a small gun.  For victory a commander needed control of the bridge and the village, a tall order.

Lord Melchett deployed conventionally with horse on the flanks and infantry and artillery in the centre.  On the right was Sir Royston with the large and standard regiments of horse.  Sir Hesketh Fleetwood commanded the two small cavalry units and the dragoons on the left.  Lord Melchett accompanied Colonel Saville who commanded the infantry.  Caught crossing the river, Sir Victor had Sir Norman Fletcher's vanguard of the large cavalry regiment and one of the standard regiments plus the dragoons covering the bridge.  On the road behind were Colonel Wanless' infantry and the artillery.  Sir Andrew Goldshaw was leading the remainder of the cavalry across the ford.

Sir Royston ready to advance


Sir Andrew's men cross the ford.  In the background the vanguard cover the infantry advance


The battle opened with both commanders trying to establish a foothold in the village with their dragoons. It was a close race, but Fleetwood's dragoons managed to get there first and establish themselves in the house to the right of the crossroads.  Meanwhile, Sir Royston was attempting to get his units up to the road to the right of the village.  On the Royalist left it was originally intended that Fleetwood Hesketh's horse were to advance to cover the gap in the hedge and then charge any columns of horse attempting to pass through it.  Seeing the opposition horse  hindered by the old ford, Fleetwood Hesketh decided, rather rashly, to go through the gap himself and then attack the enemy at the river.  This did not go as planned.  Once committed to the move his units moved slowly and Goldshaw's men were able to cross the Dash, form up and advance to meet him in the open.  Even worse, they received support from Wanless, who directed one of his regiments towards the enclosure.  

Fleetwood Hesketh's men were outnumbered and his leading unit was quickly routed.  As it poured through the gap in the hedge, the other unit was hit by a volley from the infantry.  This left them easy prey for the pursuing Parliamentary cavalry and they too were soon routed.

The first Royalist setback

Sir Royston had now reached the road and seeing the leading unit of Fletcher's vanguard, ordered a charge.  His men were not ready and there was a delay before he could get them to advance.  When the Royalists did charge it was not crowned with success.  In an even contest they lost heavily and were routed.  Fletcher's men followed up and crashed into the supporting unit defeating them as well.  Shaken by their efforts they were then hit by a volley from an infantry unit rushed to the spot by Saville and forced to retreat.  Sir Royston's third regiment stood firm while Sir Royston and Lord Melchett struggled to rally their fleeing horse.  For the moment the Royalist right was secure.

In the village, the Royalist dragoons had settled in and were getting the better of the musketry exchange with their opposite numbers. The large infantry regiment had deployed  by the crossroads, but found that half it's musketeers were masked by the buildings.  To their right, the light artillery had been engaging the enemy horse, but had now turned its attention to the infantry that were moving towards the village. 

Lord Melchett had personally led a foot regiment over to the enclosure to aid the left wing before galloping over to help Sir Royston.  This regiment was now attacked by one of the Parliamentary foot regiments and although it held it's ground, the attackers did retain their advantage.

More of Sir Royston's cavalry are driven back

More Parliamentary infantry enter the fray

Lord Melchett surveyed the battlefield; the situation was bad, but not beyond recall.  Fleetwood Hesketh had rallied one of his regiments and it could charge any unit passing through the gap in the hedge.  He and Sir Royston had managed to rally Royston's routing units and the one sound regiment should be able to hold back the enemy horse long enough for Sir Royston to reform his regiments fully.  The centre seemed to be holding, denying the village to Sir Victor was vital and Lord Melchett moved over in that direction.

Smarting from his earlier setbacks, Sir Royston was keen to take his revenge on the enemy horse opposing him.  Galloping over to his remaining unit he ordered it to charge.  Inspired by their leader the Royalist horse surged forward, to be met by an equally resolute opponent.  The two sides were evenly matched, but it was the Parliamentary horse who prevailed, though at considerable cost.  As the last full strength unit of Royalist horse streamed from the field, Lord Melchett's attention was drawn to the left, where the infantry holding the enclosure were also streaming back in rout.  Finally, from the village the remaining dragoons tumbled from the houses, jumped on their mounts and retreated in disorder.  The enemy dragoons had been reinforced by a unit of commanded shot and then the light artillery and the combined weight of fire had proved too much for them.

Sir Royston's last throw of the dice defeated

The Royalist infantry in the enclosure routed

The only option now was to pull what remained of the army back.  Covered by the remains of the cavalry the infantry and artillery trudged back down the road they had marched up that morning.  No doubt muttering about the dismal show from the cavalry and how their commanders seemed outclassed by their opponents.  For Sir Victor it was a glorious day.  Not only had he secured a crossing over the Dash, he had opened up a new area for provisioning the army and inflicted a punishing defeat on his old adversary.


Sunday 2 May 2021

Speyerbach: a WSS scenario

For our latest game we returned to the exploits of the Graf von Grommit and the Comte de Salle Forde.  The town and fortress of Landau has been besieged by the French forces and von Grommit has been given the task of raising the siege.  After waiting several days for reinforcements which did not arrive as promised, he determined to tackle the task anyway.  The delay has allowed the Comte to become aware of the allied project and he has made plans to use part of the besieging force to hold off the allies.  Through a mutual lack of careful reconnaissance, both commanders have been surprised by the proximity of their opponent and this has led to a somewhat hurried move to deploy for battle.  Once on the field of battle, Von Grommit  has discovered that the orders for the artillery have not been sent; an aide was immediately sent with a copy of the orders plus instructions to get the artillery forward as soon as possible.  Salle Forde also had problems, one of his infantry brigades had been delayed and he therefore found himself significantly outnumbered in infantry.


Here is a photo of the table layout, von Grommit's forces at the top.  There are two areas of woodland on the allied right and an impassable river on the left.  The 12" ruler is to give an idea of scale.


Seeing his advantage in infantry (8 units to 5), von Grommit ordered a rapid advance. Unfortunately only half his force, the right, complied; the Hessian infantry brigade and the left wing cavalry remained rooted to the spot.  Salle Forde was keen to avoid an infantry clash as long as possible, to give his tardy infantry brigade time to arrive, but he did order his left wing cavalry to move forward to try and hold the Allied cavalry away from his outnumbered infantry.  The allied right wing cavalry made a cautious advance, which enabled the infantry to fire a telling volley at the leading French cavalry regiment, Toulouse.  Before the French could recover, they were charged by the Veningen Gendarmes and after a short struggle routed.

The initial cavalry clash on the allied right

The Veningen Gendarmes followed up and crashed into regiment Talmont.  This regiment stood firm and drove back the allied horse, which disordered the cuirassier regiment von Grommit had led forward to support the attack.  With all the French left wing cavalry involved in the cavalry duel, the Austrian infantry felt confident enough to continue to advance, especially as they could only see one unit of infantry to oppose them.

On the opposite flank, the Hessian infantry and cavalry had now began a slow advance.  Salle Forde had moved his infantry brigade forward and supported their right flank with cavalry.  He had also moved the Cuirassier du Roi over for added support, though with events not going well on his left, this was a gamble.  Fortunately, his artillery now arrived and was immediately ordered to move up and support the Bavarian infantry, who were facing the Austrian infantry brigade.

Bavaria had now exchanged volleys with the Palatinate regiment and had also come under fire from the Metternich regiment and pressure on the French left was increasing.  Musketry now extended along the line as the Hessians moved into range.  Most of the fire was at long range so not very effective, but most front line  battalions had by now suffered some casualties.  Salle Forde ordered his right wing cavalry to attack, but once again the allied infantry were able to support their cavalry by firing a volley at the advancing Frenchmen.  This time it was regiment Aubusson who suffered heavy casualties and they were roundly defeated by regiment Fugger.

A 'Skype' screen shot taken as the cavalry clash near the river

On the French left Talmont had now been charged by regiment Erbach who were supported by the now reformed cuirassier regiment. The allied cavalry defeated the French and routed them; the French left was now 'in the air'

The clash on the French left

Talmont rout

The Austrian infantry brigade continued to advance and the Bavarian regiment was in trouble, even with artillery support.  Infantry regiment Zurlaben from the second line of infantry now wheeled to offer supporting fire.  As the Palatinate regiment charged forward they received close range volleys from Bavaria, Zurlaben and also from the artillery.  Staggered by this volume of fire, the Paltinate regiment routed.  There was no let up for Bavaria as they were now charged by regiments Herberstein and Metternich.  They held the first push and fought on.

The decisive moment on the French left

 The crew of the French light artillery had seen the allied cavalry victory on their left and taking a gamble, re-deployed to face them.  Regiment Erbach, intent on rolling up the French infantry, charged.  They received artillery fire at close range being stopped in their tracks and then fell back to reform.  As they did so the first units of the second French infantry brigade appeared on the field, ready to advance and support the hard-pressed Bavaria and artillery.  The cuirassiers who should have been supporting Erbach, had not received the order to advance and were still some way away.

The arriving French infantry were not a moment too soon.  Bavaria was buckling under pressure of the Austrian attack.  Eventually, they gave way, but regiment Herberstein also had to fall back and Metternich had taken heavy casualties.  Royal Italien wheeled left to face the allied cavalry and regiment Solre and Montreux moved forward to support the artillery.  These fresh units swung the advantage in the French favour.

Bavaria rout

On the French right, the cavalry had been fighting hard to hold back the allied cavalry.  Having defeated Aubusson, regiment Fugger now attacked the Cuirassier du Roi.  They proved to be a tougher nut to crack, routing Fugger and then taking on the opposing Jung Hannover Cuirassier.  As the two units battled, the Spanish horse in French service moved to the flank to add their weight to the melee.

The final position
At this point, time ran out and von Grommit conceded he would not be able to break through the French.  For his part Salle Forde was aware of how close he had been to defeat.

The source for the scenario was Project WSS by Kronoskaf, who also have the very useful site on the Seven Years War.  I scaled down the forces for the 6 x 4 table and as usual we used our own version of the Pike and Shotte rules, with, on this occasion, the unit stats from the "Last Argument of Kings" supplement to the Black Powder rules.  Here is the map which appears on the Speyerbach page of Project WSS


The delays to the allied artillery and French infantry did take place and I made their arrival dependent on dice rolls by the respective commanders.  The French were far more likely to receive their infantry within the first five moves.  Historically, the allied guns only arrived as the allied army retreated.