Friday 16 December 2022

Wistanstow: an ECW scenario for PIke and Shotte

 Steve and I played this scenario some eight years ago, the report is here.   Since then our ECW collections have grown and our own version of the Pike and Shotte rules have evolved to incorporate various changes.  With this in mind Steve thought that revisiting the scenario would be a good 'end of season' encounter.  (The game was actually played before Christmas, but it has taken me this long to get around to posting it on the blog).

The Parliamentary forces  under Lt-Col. William Reinking are deployed to hold the village of Wistanstow, just to the north of Craven Arms in Shropshire.  They are being attacked by a larger Royalist force under the command of Sir Michael Woodhouse.  Reinking's objective is to hold the village long enough to enable the parliamentary baggage train to get away and then withdraw in good order northwards towards Shrewsbury with as much of his force as he can.  Woodhouse wants to break through as quickly as possible, capture the baggage and destroy the enemy army.


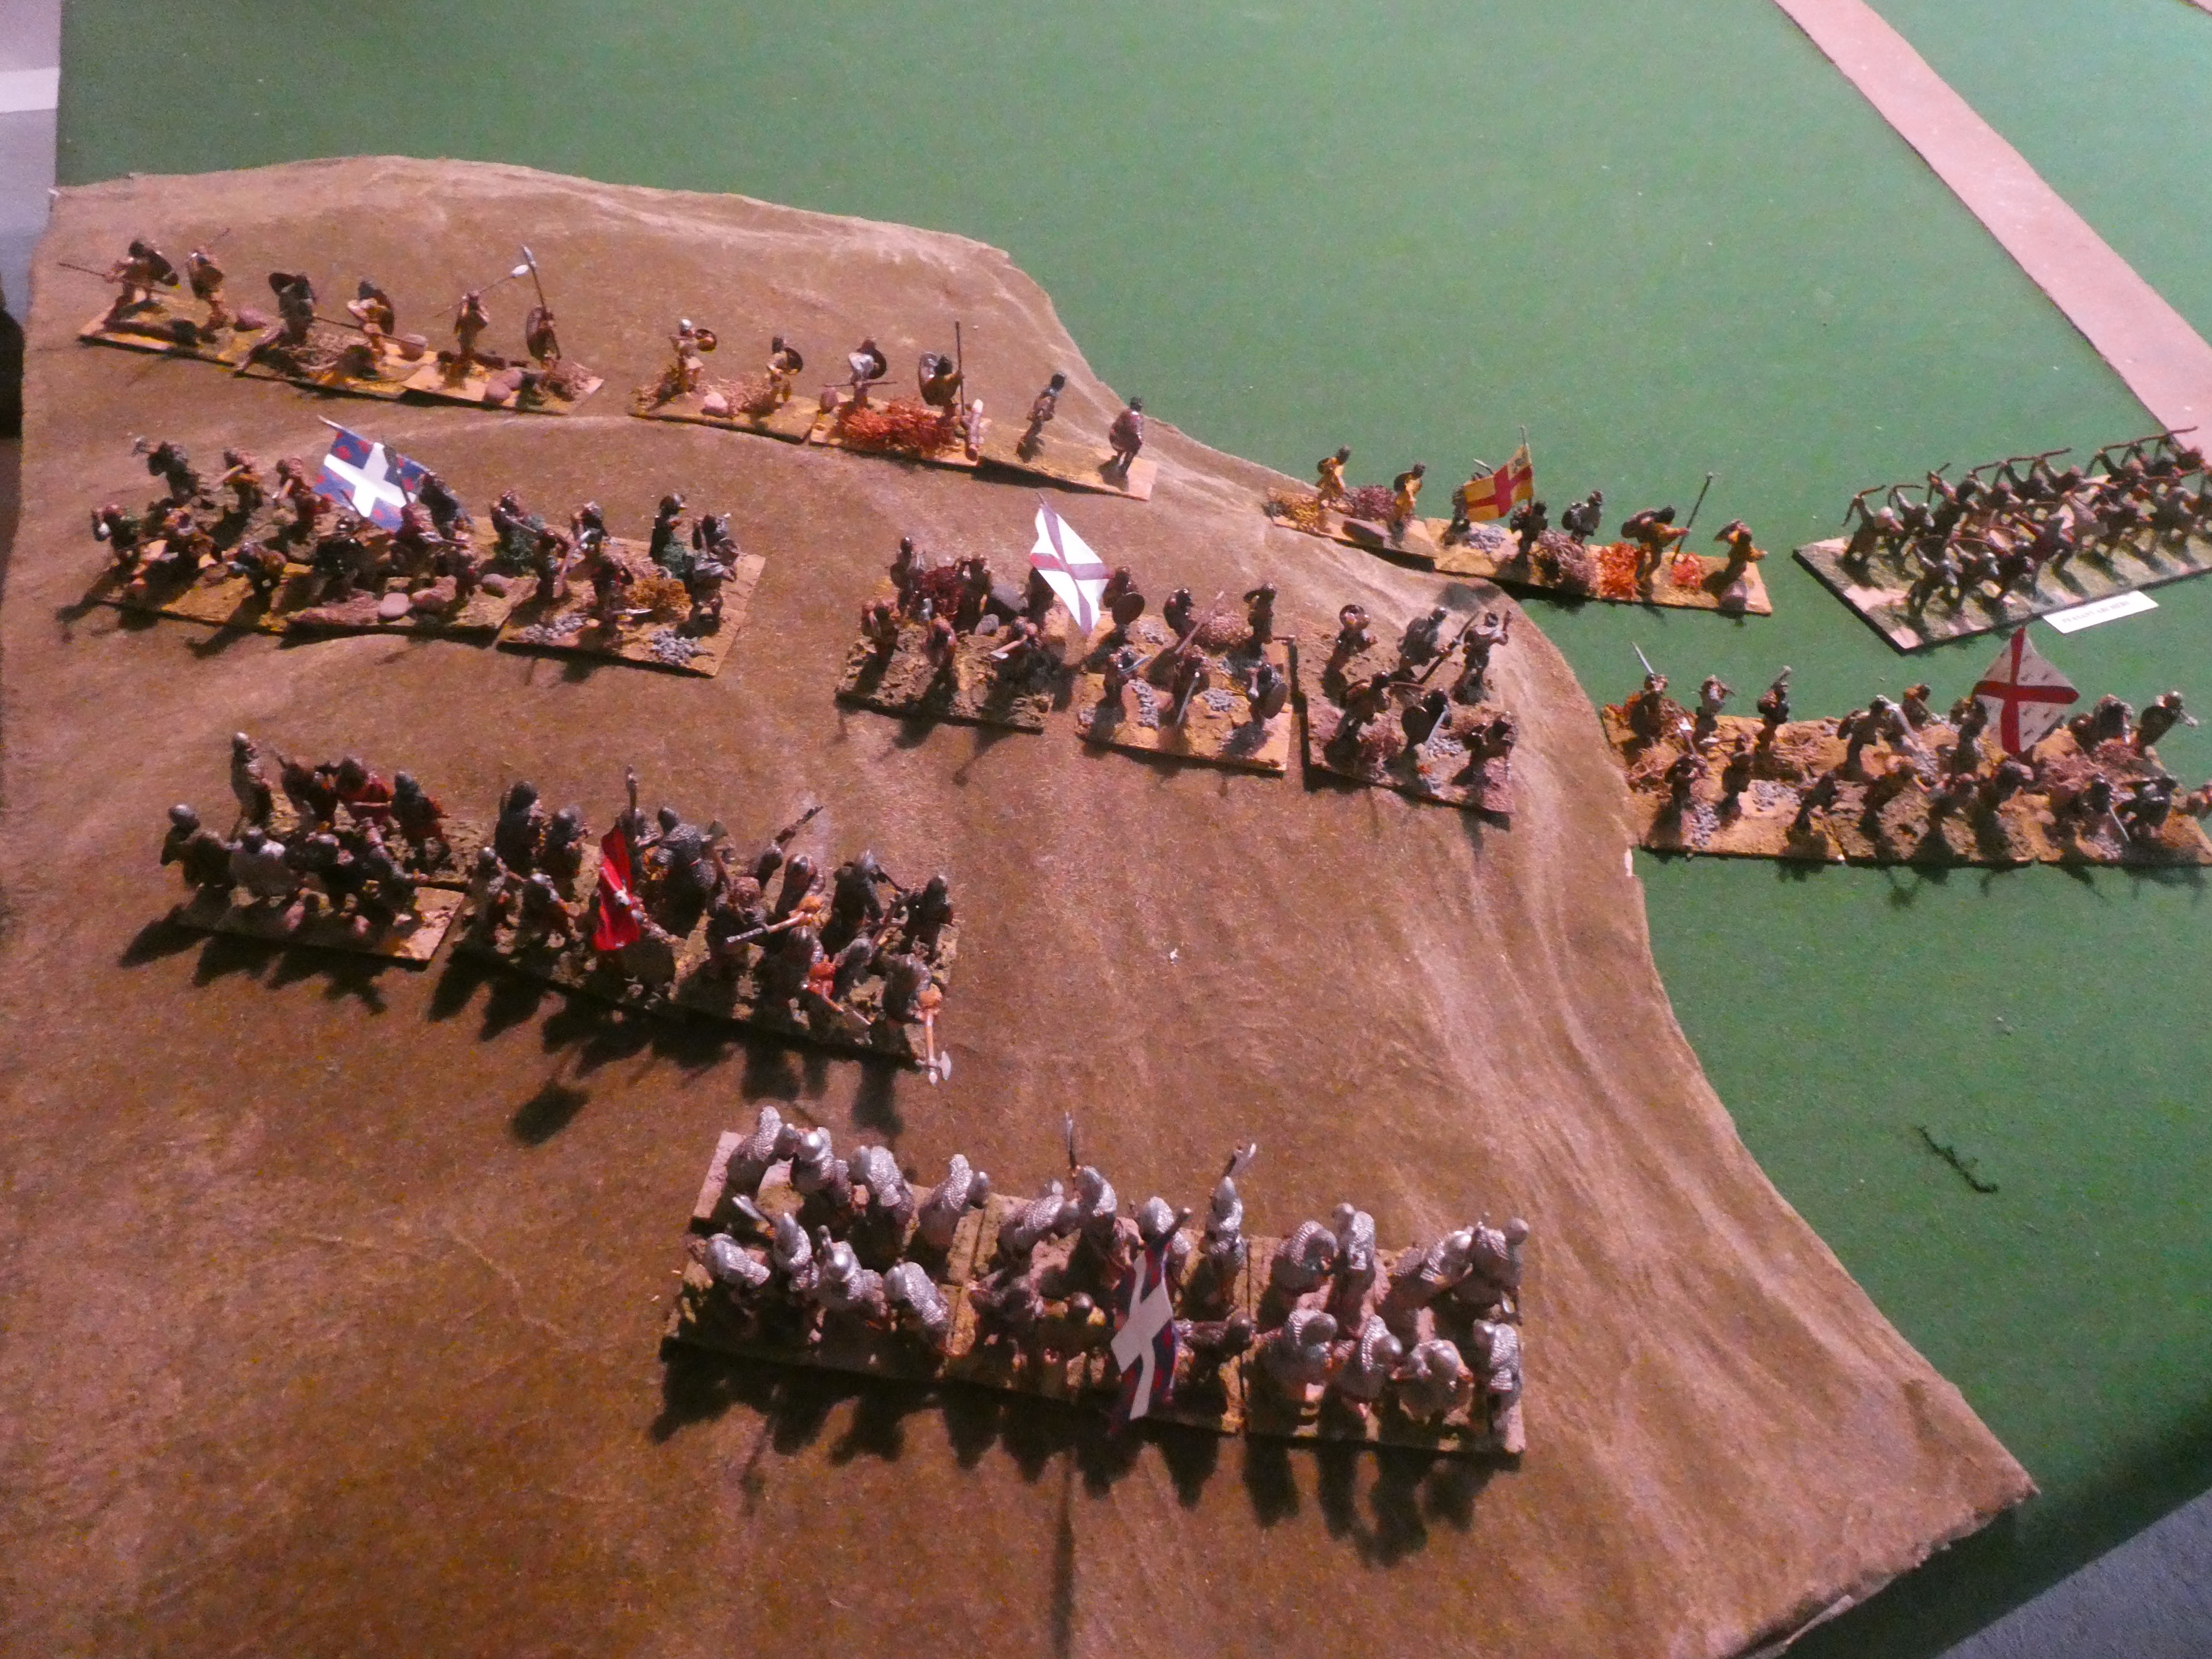
The Parliamentary position at Wistanstow can be seen in the photo above.  Beyond the road is Mackworth's  regiment of foot, then a field gun covers the road to the south.  Next is Hungerford's regiment and a light gun, with Lloyd's regiment to their right.  The garrison horse cover the right flank with Lloyd's Horse held in reserve at Wistanstow.

Woodhouse deployed Scudamore's horse on his right, with Scudamore's Foot, a light gun and a forlorn hope of musketeers. 


On the road from the south was William Sandy's Horse ready to make a charge straight up the road.  Beyond was the bulk of the infantry, four regiments, deployed in two lines and supported by a light gun.  On the left were Lunsford's Horse and Sandy's Dragoons and held in reserve were the Ludlow Horse.  Woodhouse was also expecting his own artillery train to arrive (this was dictated by die roll).

The close terrain in the centre almost ensured a protracted struggle between the rival infantry forces.  Above can be seen the contest between Hungerford and Crott by the road.  Scudamore had more open terrain to his front and he skillfully managed the coordinated advance of the forlorn hope and Scudamore's foot.  Their fire, ably supported by the light gun sufficed to force Mackworth to retreat to the churchyard and take advantage of it's stone wall


On the Royalist left, Monmouth's regiment was not faring so well.  Their attempt to dislodge Lloyd's foot was repulsed with heavy loss.


The Garrison Horse on the Parliamentary left attempted to prevent Lunsford's Horse and the dragoons from gaining access to the lane which led behind Lloyd and Hungerford.  In the confines of the lane the fight was a long one, but in the end, it was Lunsford who prevailed.


Along the road in the centre Sandy's and Lloyd's horse had been watching each other.  Reinking had moved the artillery to the right to support Hungerford.  That threat removed, Sandy's charged with Lloyd responding.  Lloyd prevailed, but was reluctant to move further forward; a reluctance seemingly justified when the Royalist artillery was observed to arrive and deploy covering the road.


Reinking saw that the horse on the Royalist right was attempting to work around his left and sent his final reserve, the second troop of Lloyd's horse in that direction.  However, his main concern was the increasing pressure on his infantry.  Mackworth was having difficulty holding his position in the churchyard.  The combined fire of his attackers was inflicting increasing losses, even behind the stone wall.  A final, telling volley proved too much and Mackworth's men broke and fled the field.


Reinking's attention was elsewhere, attempting to rally Hungerford's foot .  The regiment had broken when attacked by Crott's foot and had fallen back as far as the northern edge of Wistanstow.  Reinking's appeals to the men to rally had fallen on deaf ears and they had streamed from the field.  Crott's foot had switched their attentions to Lloyd's regiment, but had been driven back when the field gun fired into their flank at close range.


The reprieve for Lloyd's men was brief, as Gerard's foot moved forward and drove them back in rout.


With his infantry driven from the field and his right wing cavalry in disarray, Reinking ordered Lloyd's cavalry to hold off the Royalist cavalry as long as they could so that he could perhaps get his artillery away and give his infantry a chance to reform.

Although an uneven contest in terms of numbers, the terrain does give the Parliamentary commander a chance of achieving his goal of delaying the Royalist advance.  Many thanks to Steve for setting up the game and to Bob for commanding the Royalists.

Sunday 4 December 2022

RECON 2022, Pudsey

 The familiar sign that another wargaming year is coming to a close is our trip to the RECON show at Pudsey which is organised by the Wakefield & District Wargames Club.  As I mentioned in my previous post we were attending in support of the Lance & Longbow Society and putting on a participation game based on the battle of Stoke Field, 1487.

Other games were of course attending and here are a few photos to give a feel for the range of what was available.

James Mitchell had his 'Sudan Death' 2mm scale game.

The desert table mat works well with this scale of figure


At normal viewing distance you don't appreciate the work that has gone into these small figures

Next door by contrast were the Hustle Club with their Dragon Rampant game 'The Ghosts of Mousillon'


Upstairs, near the Bring & Buy stall were the Yarkshire Gamers with their Italian Wars game 'The Siege of Forli'


Many more photos of this splendid game can be found on Ken Reilly's Yarkshire Gamer podcast here  You will also find an interesting piece on wargames shows in general.

Also upstairs was a game by the Glory Boys, 'Zombie Glory'.  I was particularly taken by the buildings which gave the flavour of a typical town in one of the numerous Zombie films churned out by Hollywood.


We were set up in the main hall and ran our game twice and managed to recruit a couple of members of the public to join in.  Both sides managed one win,  the result in each case could have gone either way with both sides one unit loss from defeat.

Scales prepares to charge the Irish Bonnachts

Lincoln with the rebel left wing moving up to support Schwarz and his German mercenaries  

Having weakened Scales' cavalry the Gallowglass move in to finish them off
  
Thanks to Andy, Bob, Steve and Will for helping with the game; the gallant members of the public, Jim and John,  plus  David and Lynne.  Not forgetting Chris Jackson and the other members of the Wakefield club for organising the show.

Monday 14 November 2022

Preparation for Recon 2022

 As usual our final show visit of the year will be to the Recon show at Pudsey at the beginning of December.  Once again Steve, Bob and I will be supporting the Lance & Longbow society by putting on a medieval period wargame and this year it will be Stoke Field 1487.  This battle was the last major attempt by the Yorkist faction to overthrow Henry VII, the victor at Bosworth two years previously.  Their army led by the Earl of Lincoln contained disaffected Yorkist nobles and their retinues plus German mercenaries and a large number of Irish troops.  Henry was gathering his own army and the Earl of Lincoln probably hoped to attack before the royal troops were fully assembled.

Please note that in the following photographs the majority of the troops have not been given the correct flags for this battle.  We were just working through the scenario and checking the mechanics of the rules (our own version of 'Lion Rampant') when dealing with the various troop types.


A view along the Yorkist line

The Irish ready to attack

 
The Royal vanguard under the Earl of Oxford 

The Irish charge into the archers

Royalist mounted troops and the Irish 

The result of our game was a decisive Royalist victory, as in history.  If the Irish manage to get into contact, they can cause damage; the main problem was surviving the Royalist 'arrow storm'.  Also, the mercenary pikemen did not fare too well against the enemy billmen.  A great deal depends on the numerous Yorkist skirmishers managing to protect the melee troops long enough for them to get into charge range.  Plenty to ponder upon and a few more trial runs before the event.

Sunday 9 October 2022

The Battle of Princeton

For a recent game, Steve devised a scenario for Rebels and Patriots covering the battle of Princeton.  This took place in the days following Washington's crossing of the Delaware and was a meeting engagement, with neither side anticipating meeting any enemy troops.  A loyalist force, commanded by Charles Mawhood was marching south towards Trenton to join the main force commanded by Cornwallis.  When the loyalist troops were spotted near William Clarke's farm, Washington ordered Mercer's brigade to investigate.  

The Loyalist force covers the road to Trenton

Mercer's brigade prepares to advance

A roll of the dice decreed that I should command the Revolutionary forces and I prepared to advance.  However, my opponent, Bob, won the initiative and opened up with his artillery.  His target was a lone battalion on my left flank which was covering the advance of John Cadwalader's brigade.  The first rounds caused two casualties and my required morale test was failed; meaning the unit fell back and needed to rally in my phase of the first turn.  I rolled double one (not the only occasion this would happen in the game), another failure and the unit routed from the table having neither advanced nor even fired a volley.

My first rout of the game

This was doubly unfortunate, not only did I lose one of my few 'continental' units, but it also allowed Bob to concentrate his fire on Mercer's brigade; which he did with telling results.

Mercer's advance was slow and disjointed (yet more low dice results) meaning that my leading unit was always subjected to the fire of several opposing units.  Losses increased and although my volleys did inflict some damage, it was not enough to slacken the incoming fire.

It was a relief therefore when Cadwalader's brigade arrived; but yet again failing the test to move hampered the advance and once again the Loyalist artillery inflicted heavy damage.  Washington arrived with yet more reinforcements and I attempted to outflank the left of the Loyalist line and cut the route to Trenton.  My artillery was of a lighter calibre than that of the Loyalists and I therefore decided to move it forward to try and engage in some counter-battery fire.  On reflection this was probably a mistake.  Not only did the artillery suffer the (by now) usual failure to move, but whilst moving it presented a concentrated target.  Seemingly laser-guided shot from the Loyalist artillery battered my artillery and before it could even fire a round in anger it failed two morale tests and routed from the field.

One advantage I did have was numbers, I outnumbered the Loyalists by almost 4:1 and eventually even I managed to get some units into musketry range.  They did their best, but the losses they had received in the advance were such that their volleys lacked real power and the d****d Loyalists clung resolutely to their ridge.  My last chance was the outflanking manoeuvre; but when the troops got into position they hesitated to fire (yet more double ones) and paid dearly for it.  A couple of quick volleys and a bayonet charge from the Loyalist foot and my lads were 'running for the hills'

The final push fails

Overall a convincing (overwhelming may be more accurate) victory for the Crown, but would things change when we reconvened after lunch and changed sides?

I felt reasonably confident as we started the return match, Bob had triumphed hadn't he and although I recognised he was unlikely to throw low dice as often as I had, I had quality on my side.  Bob won the initiative and began to move.  I watched as his units moved forward with a cohesion I had failed to achieve.  The Loyalist artillery seemed to have decided their work was done and missed more often than they hit.  Enemy riflemen established themselves in an orchard close to my centre and began whittling away at the thin red line holding the ridge.  As the militia regiments came closer I saw an opportunity to launch a bayonet charge.  Now, in Rebels and Patriots you charge the number of inches equal to your command roll.  I needed a '7', an average score and also the most likely.  It was a six.  So I dutifully moved forward the distance and stopped.  In his phase Bob fired a volley and the tattered remains of my unit broke and ran.  This loss increased the pressure on my centre and the situation was not helped by having to send the grenadiers off to the right to cover a move by Cadwalader's brigade to cut the road.

The end was in sight and with another of my units failing its morale test and fleeing there was nothing to prevent the road falling into enemy hands.

Even though I lost twice we had an enjoyable days gaming, with much friendly banter.  Many thanks to Steve for setting up the scenario and hosting the game.  For those who may wonder, my eventual tally of double 1's for the day ended at 16.  Not too bad when you bear in mind that things tend to even out and I could therefore be free of them for a game or two?

Thursday 25 August 2022

Chillcon

 For the first time in 6 years Steve and I crossed the Pennines to visit a wargames show in Sheffield.  The last time had been to, what I think was,  the final Triples show.  Our journey this time was to Chillcon.  It was very much a lets give it a try trip.  

On the positive side, the show does attempt to attract a broad range of visitors, not just miniature gamers, as the programme states "a convention for all aspects of tabletop gaming".  There was a painting competition, something of a rarity these days and although the emphasis seemed to be on SF and Fantasy, you could not argue with the skill of the painting on display.  In addition, there was a hobby clinic, which looked at airbrushing, shading and terrain.  One area was devoted to boardgaming, with a collection of games for visitors to try.  This was a particularly good idea as you would not want to shell out £30 or more for a game only to find that you don't enjoy playing it.

The games available in the two halls were all participation games, encouraging people to 'give it a go'.  Particularly in the morning there were a good number of attendees, certainly more than enough to fill the car park and plenty of families with children.  This is what is needed to sustain the hobby, which is acknowledged to suffer from an aging demographic.


This is photo of a 'Black Seas' game which Steve and I tried.  Set during the AWI a Royal Navy ship is attempting to bring despatches to the fleet and a small sqaudron of Revolutionary ships is trying to stop them.  Historically, the RN ship got through with little damage.  In our game, the historic result was achieved, although the brig which accompanying the RN ship was captured.  

If you like the large demo games (as with Partizan, Salute, etc) this will probably not be the show for you.  It's intention is to encourage people to join the hobby, or  try something new, (without having to go to the expense of buying expensive games or figures/models).  Will we go again?  Probably not, but that is due to our particular interests, it is in no way a criticism of she show or the organisers.

Tuesday 26 July 2022

The Governor's Residence: a Black Powder scenario

Once again Steve kindly organised the traditional "Sunday after Phalanx" game for the visiting Gentlemen Pensioners.  Attendance was lower than previous years perhaps due to continuing concerns over Covid and the aggravating factor of the drastically increased cost of fuel.  This year the game was scaled back to Steve's usual 6 x 8 table and was set in the Sudan.

News had come through to Imperial headquarters that the governor's residence near Kagbar was under siege by Amir Khat .  Such an affront to British prestige could not be ignored and consequently a large force was assembled to restore proper order.  Two brigades of British infantry, (Brigadiers Ross and Wakefield), with a brigade of mounted infantry, (Goodrich)  and one of cavalry (Nowell-Lees); were accompanied by two brigades of Egyptians (one each of infantry and cavalry, (Brigadiers Al-Hussein and Badawi respectively).  The whole force was under the command of General Wilberforce Forbes-Robertson.

When the Imperial force came close to Kagbar, they found that there was a force of Dervishes on the ridge close to the residence.  They had artillery and this was shelling the residence, attempting to break down the walls or gate.  Forbes-Robertson ordered Nowell-Lees and Goodrich to advance directly towards the ridge, but to beware of being ambushed by other Dervish forces.  The Egyptians were to move towards the village of Kagbar itself, whilst Ross and Wakefield would screen the settlement of Fareig which lay in front of them and with the majority of their troops protect the flank of the cavalry and mounted infantry. 

The Dervish force threatening the Governor's residence


The Imperial forces begin their advance


The residence's defenders

The advance began but almost immediately, Goodrich's men came under fire from Fareig.  Although the task of dealing with Fareig had been delegated to Ross, Goodrich sent one of his units to silence the riflemen.  This move hampered Ross's advance and also forced Wakefield to move to his right to avoid the deployed mounted infantry and their attendant camels.  No sooner had the firing started than two units of Dervish infantry rose from concealment and moved towards Ross's men


The Egyptian brigade moves forward

The Dervish move out of cover to attack the Imperial left flank

The cavalry and mounted infantry advance in the centre

On the right, the Egyptians were also moving forward, lead by Badawi's cavalry.  Suddenly from behind some dunes and scrub bodies of Dervish cavalry appeared, moving swiftly towards them.   The leading unit of Egyptian cavalry turned to face their assailants, but as they did so a unit of Dervish infantry charged out of the village of Kagbar and into their flank.  Reeling from this attack the Egyptian cavalry were then charged by the Dervish cavalry and routed.

The Egyptian cavalry are ambushed

On the left the battle for Fareig continued and Ross deployed his battalions to meet the Dervish attack. The West Borsetshires were charged as they struggled through the scrub and  were driven back in spite of the best efforts of their officers to hold them in position.


One of Ross's infantry battalions is driven back in disorder

Nowell-Lees had continued to advance and was contemplating bringing forward Goodrich's command to establish a solid base from which to assault the ridge.  He had ordered his units to halt to await the mounted infantry, but the order had not got through to the Lancers who were the lead unit.  Their commander thought he saw a chance to capture the Dervish artillery and drive off the infantry on the ridge.  With trumpets sounding the Lancers swept forward onto the ridge.  They dealt with their opponents quickly, but then command and control seemed to evaporate and the cavalrymen dallied, rather than driving home their advantage.  
 
The Lancers sweep onto the ridge

On the right the Egyptian position was perilous.  Even more enemy mounted units were appearing and they were joined by infantry from Kagbar.  To give time for Al-Hussein to deploy the infantry, Badawi ordered the Bashi-Bazouks to charge.  The Egyptian cavalry tried their utmost, but in the end they were overwhelmed by sheer weight of numbers.  All now depended on the fighting qualities of Al-Hussein's infantry.
The Egyptian forces come under heavy pressure 

Although he had been ordered to support Nowell-Lees, Goodrich had been forced to dismount his men and form a firing line to try and hold back waves of Dervish infantry which had attacked from the direction of Kagbar and also the dunes behind Fareig.  Forbes-Robertson ordered Wakefield to move his men forward to support Goodrich, though half the command was involved in trying to suppress the riflemen in Fareig.  Fortunately, the artillery was now shelling the village and the enthusiasm of the defenders was wavering.  Even so, an attack on Fareig, by one of Goodrich's units was driven back with heavy loss
Goodrich's men come under attack
In the centre, another of the mounted infantry units was struggling to hold off an attack by two units of Dervish warriors.  To their left, a unit of Dervish and broken through and was only stopped by Wakefield deploying two battalions to prevent the Dervish from swinging round to reinforce the defence of Fareig.  

Further forward, Nowell-Lees ordered the Hussars to charge yet more Dervish infantry that could be seen massing in and around Kagbar.  The Hussars lost a lot of men to rifle fire as the advanced and were unable to prevail against the masses of tribesmen, necessitating a retreat.


The failed charge on Kagbar
At Fareig, Ross was at last making headway.  The artillery had unsettled the defenders and an infantry assault finally drove off the Dervish infantry.  Captain Barnes RN had led his 'Blue Jackets' forward with his usual steadfastness and they had successfully driven off several determined attacks by the Dervish warriors.  The Naval infantry advanced past Fareig, supported by other units of Ross's command only to be met by another of wave of attacks.


Steadfast in defence, the naval infantry

Meanwhile, the unit nearest to the beleaguered residence, Nowell-Lees' lancers, far from pushing forward to offer some hope to the garrison, now found themselves in a precarious position as Dervish infantry began to encircle them.  Nowell-Lees had cantered forward to assess whether he should reinforce their position on the ridge, but he now found himself having to fight for his life as tribesmen surged around him.  Desperate, he ordered the retreat be sounded, but there was no way out and the lancers and their commander perished.

The lancers are doomed


Amir Khat's plan was succeeding.  His lieutenants were attacking in successive waves, pinning back the Imperial troops and preventing them from reaching the residence.   


Ross's men face yet more attacks

Goodrich and Wakefield struggle to hold the centre

Much as Forbes-Robertson urged his subordinates to get their men forward, little could be done in the face of the incessant attacks.  Ignoring their casualties, the Dervish warriors threw themselves at the lines of British infantry and in the distance, the Dervish artillery could be heard battering away at the residence.

Finally the gates of the residence were split asunder and this was the cue for Dervish infantry to surge forward, eager to secure the victory.  The defenders did what they could, but it was a doomed enterprise against such overwhelming numbers.  When the building had been ransacked it was put to the torch and as the smoke of the fires rose into the sky Amir Khat ordered his men to begin to disengage.  Forbes-Robertson was left in control of the battlefield, but he had failed in his mission, his sole remaining duty was to tend to the wounded and bury the dead.


The end - the residence falls

A most enjoyable game.  The Dervish command played their cards well.  They stalled the Imperial advance at every opportunity and kept plugging away with their artillery, eventually smashing the gate.  Once that happened the fall of the residence was inevitable.  The governor did manage to escape, though his staff and garrison were put to the sword.  It is said he never spoke of the event in later life and his memoirs (in several volumes) are strangely silent on the matter.  Forbes-Robertson was recalled and offered promotion; to a desk, where he spent the remainder of his career.