Monday 28 May 2012

Battle of Gogar 1650

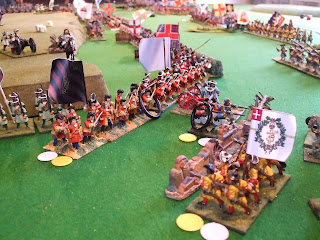
The action this week comes from Cromwell's 1650 campaign in Scotland which culminated in the battle of Dunbar.  Prior to the decisive battle at Dunbar, Cromwell had twice attempted to draw the Scottish army out of the Edinburgh defences.  It was during the second attempt that the action at Gogar was fought.  The English forces were reaching ever further westwards, seeking a gap in the Scottish lines to try and establish a position on the Forth from which to strengthen their naval hold on the area.

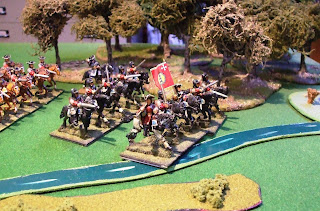
The English force of three foot regiments, two horse regiments and a regiment of dragoons, augmented by a unit of firelocks and two light guns; faced a scratch defence of two Scottish foot regiments, two horse regiments, a unit of dismounted dragoons, a small unit of 'moss' troopers and some Highland archers.  The Scots also had one heavy gun and a frame gun.  The defence rested mainly on a redoubt by the village of Gogar.  Away to the east (Scots left) the Gogar Burn flowed in broad, shallow, meandering course between steep, muddy banks and marshy fields.  To the west low wooded hills made manoeuvre difficult.

The dice decided that I would command the Scots, and I at once began to reposition the reserve.  Maclean's Horse moved off to the left, hoping to outflank any attack on the redoubt.  Forbes Horse moved to the opposite flank to oppose a threatened attack by the English horse.  To my front the were the English foot and the first to advance were Skippon's who moved towards the redoubt. On their right were the firelocks and a Rainsborough's foot regiment; they moved towards my centre pinning my infantry and concentrating their artillery on the pike block holding the road past Gogar .

At first things seemed to be going well.  The dragoons were inflicting casulaties on Skippon's infantry and suffering little in return due to the stout breastwork.  The light frame gun was adding to the English infantry's discomfiture and just for good measure my snipers were taking pot shots at the officers.  Skippon's got within standard range and fired a couple of volleys, but their casualties, particularly amongst the officers lead to them having to fall back to rally.  The firelocks were also suffering, being fired on from front and flank; they suffered over 40% casualties before finding a position from which they could exact some revenge, firing volleys at the Scots musketeers supporting the pikes.

The English snipers now took a hand and from a rocky outcrop they fired a shot which picked off the Scots commander.  He was carried into Gogar 'Town House' where the local doctor did what he could, but with overall command now removed, each unit's colonel now made their own decisions.

On the English right the cavalry faced Forbes Horse across the river. Pistol shots were exchanged, but to little effect, until Forbes himself took a ball in the elbow.  He retired to the rear to have the wound dressed and without orders his men fell back too into the lee of a low mound.  The English horse, encouraged, crossed the muddy stream, but, before they could reform, Forbes second squadron appeared on their flank and charged.  The melee was confused, the English were on bigger horses and better armoured, but the Scots had the initial impetus.  Neither could gain an advantage until the arrival of Forbes with his reformed squadron, when the Scots began to gain the upper hand.

On the opposite flank Maclean's Horse continued on it flank ride.  It lost men to fire from the English dragoons, but pressed on, eventually reaching the English rear area.


But it was in the centre where affairs would be decided.  The pikes holding the road were coming under sustained fire from the light artillery and the English reserve infantry.  As losses mounted the survivors closed the ranks till only a pitiful handful remained.  With no officers left it fell to the oldest survivor to decide that they had done all they could and step by step they fell back towards their supports.  Seeing the opposition fall back the English reserve advanced and to their left Skippon's surged up the hill towards the redoubt.  The dragoons defending the redoubt had by now suffered heavy casualties and struggled to hold the English foot back.  The final infantry reserve had been held back to cover the road, but the commanding captain instead led it instead to aid the dragoons.


He was able to do this because the English foot attacking down the road had been targeted by the Scottish artillery and the musket reserve.  Packed together on the narrow road between the hill of Gogar and the Gogar Bog they had suffered heavy casualties.  To their front they saw Forbes Lancers and Captain Hoffman's 'Mossers', Skippons attack had stalled and Rainsborough's were losing the 
musketry battle to their right.


 To cap it all Cromwell was heading towards the rear with the cavalry.  Maclean's arrival had prompted this move and although they could not stand against the English horse their position was enough to convince Cromwell that a breakthrough at Gogar was not going to happen and he should therefore fall back on Musselburgh.

The Scots had the victory, but losses had been high and they were mighty glad to see the English leave the field.      

Friday 25 May 2012

Holiday Reading

I have just finished reading a very interesting book called "City of Fortune: How Venice Won and Lost a Naval Empire" by Roger Crowley.  My background reading on the Crusades had already alerted to me to the influence of the Venetians in the 13th century, but I had not appreciated the full range of their impact.  In true wargamer fashion the 'butterfly' effect began to kick in, "wouldn't a small Venetian army be useful?, so many potential opponents, opportunities for land and naval actions."   The same sort of thing occurred a few years ago when I read John Julius Norwich's trilogy on Byzantium.  Before I knew it, I had the first (and up to press only) installment of my thematic Byzantine army raring to take on Bulgars, Khazars or any of the quite extensive list of potential opponents. (Even themselves if there was a coup!).  However, as you guessed, the butterfly only lingered for a short time before winging its way to another project.

So far I have managed to avoid plunging into  building a Renaissance Venetian force, though I was sorely tempted by the sight of some galleys at the Triples show....  That being said the Venetians could be set against Tartars, Ottomans, Pisans, Genoese, Hungarians or Norman settlers.  They could fight between themselves for control of disputed islands.  There could be small scale galley actions involving attacks on convoys- no need for dozens of models to refight Lepanto!  The most interesting part was the chapter on the siege of Venice in 1380 .  Genoa, aided by other Italian states and the Hungarians almost succeeded in defeating Venice.  There is plenty of potential for small scale raids on fortifications, actions between rival bands of condottieri and attempts to sink ships in channels to block supply routes.

If you have started to look around for a book to read whilst sunning yourself on holiday this summer Crowley's book may be worth a try.  His style can be a bit of an acquired taste, but if you can get beyond that there may be enough material to furnish several scenarios for those winter games nights.  The Junior General website can provide printable galleys and rules to dabble in the period if you do not want to inflict further damage on your wallet.

Tuesday 22 May 2012

Aughrim 2

Last week the game was left with the point of decision being on the Jacobite right, where St Ruth was attempting to halt an advance by the Dutch and Danish infantry and cavalry.  The second evening began with Sarsfield leading forward his last unit of cavalry in a desperate attempt to buy time for reinforcements to arrive.  Sarsfield prevailed in the ensuing melee and rather recklessly pursued the defeated Dutch horse.  This resulted in the disordered Jacobites being caught by fresh cavalry and pursuit turned into rout as the remnants of Sarsfield's men tumbled from the field. 

Undaunted by this reverse, the cavalry commander turned to the cavalry reserve released by St Ruth and led that forward.  Again he suffered defeat, and had to turn to the final reserve which had been moved from the left flank.  Meanwhile the fire fight continued between the grenadiers defending the right flank and the guards battalions attacking them.  Heavy losses were suffered by both sides and soon only a few companies of powder-stained infantry remained with the colours.  The restricted front made it difficult for the Williamites to reinforce or extend the line, unlike the Jacobites , who benefited from the arrival of battalions from Lord Bellew's and the Grand Prior's regiments, who moved up on the right of the grenadiers.  An attempt by Ginkel to extend the line to the right, by moving Von Bulow's regiment forward was met by volleys from the 1st battalion of the Irish Guards who had been given the 'honour' of defending this 'knuckle' in the defence line.

Further along the line, the Jacobites continued to delay the advance by the English and Hugenot infantry and the left of the Jacobite line seemed secure from any advance.  To St Ruth the threat still lay on his right and here events were to take a dramatic turn for the worse.

The repulse of the Jacobite cavalry had allowed the Williamite cavalry to advance and deploy on a wider front.  This gave the Jurl regiment the freedom to deploy facing the flank of the Jacobite infantry line.  With their attention occupied by the infantry to their front, the men of Lord Bellew's regiment did not see the cavalry bearing down on them until it was too late to reform to meet the threat.  Already reduced in numbers by their fire fight with the Danish guards the Jacobite infantry did not stand, but turned and routed back up the hill towards the centre of St Ruth's position.  Sensing an opportunity, the colonel of the Jurl regiment urged on his men towards the flank of the next infantry unit.  This unit, the Grand Prior's regiment although fresh to action refused to stand when they saw colleagues routing past them.  Eventually the cavalry reined in at a fence blocking their path, in a few minutes they had destroyed the right flank of the Jacobite position.  The grenadiers, having stoutly stood their ground against heavy odds were demoralised by the sight of their supports routing away and also routed.  The 1st Battalion of the Guards were also forced into retreat by the flood of routers.

St Ruth hurriedly stripped yet more units from the 'quiet' sectors to cobble together a new line behind which he hoped to rally the fleeing units.  The second battalion of the Guards was ordered forward to fill the gap left by the first.  Stout work was done by the artillery, virtually the only unit on the Jacobite right to stand their ground.  They worked like demons firing as fast as they could at the advancing infantry.  However, they stood too long and as the infantry came in range their volleys quickly began to inflict casualties.  The rate of fire began to fall and soon there were too few to man the guns and the pitifully few survivors fell back.

Sarsfield had one last throw of the dice and led forward is final reserve.  This met the last uncommitted Williamite cavalry in a fierce melee which involved both brigade commanders.  Eventually the Jacobites prevailed, but as the cavalry regrouped they found the body of Sarsfield amongst a group of dead enemy horsemen.  The Williamite cavalry were destroyed, but the Jacobite cavalry were too few in number to operate as a viable threat to the Williamite infantry, so they formed up and slowly gave ground in front of a cautious enemy advance.

Elsewhere the English and Hugenots had taken advantage of the thinning of the Jacobite lines to move forward and in some places had reached the main defence line.  Uncertainty about events on the flanks caused some wavering in the infantry units and anxious glances over the shoulder were not eased by increasingly strident commands to 'look to your front'  The grenadiers attached to the Hugenot brigade had attacked the second battalion of the Irish Guards as they attempted to hold the 'knuckle' and in a fierce melee forced the Irishmen to give ground.  As these elite troops grudgingly fell back St Ruth realised that the day was lost and the best strategy was to preserve as much of the army as possible for the next battle.

Taking advantage of the gathering gloom and the weariness of the Williamite forces the Jacobites began to  retreat down the road towards Galway.

Monday 21 May 2012

Triples 2012

It is May, so it must be time to trek over the Woodhead Pass for the Triples Show at Sheffield.  The game put on by the Lance and Longbow  Society was Grandson; a clash between the Swiss and Burgundians.  All the figures had been provided by Bob Metcalfe and were a mix of Perry Plastics and metal figures.
Historically, the advance guard of the Swiss army won the battle on its own.  Charles' plan of his missile troops withdrawing before the Swiss, drawing them forward to be attacked in flank by the heavy cavalry failed because the withdrawal was seen by the rest of the army as a sign that the battle was lost and a general retreat resulted.  Unfortunately, I as the Swiss commander was not so fortunate.  The advance was fairly swift, so casualties from missile fire were light.  However, the charge failed to fully contact the Burgundian line and two elements of the Swiss block were disrupted.  As they tried to recover the Burgundian cavalry, led by Charles moved forward around the flanks.
 Swinging round the Italian knights charged the flank of the Swiss, breaking into the formation.  Somehow, the Swiss managed to hold on; though their neighbouring unit of pikes were not so fortunate.  Requiring anything but a 10 on a d10 to stand, they of course rolled the required 10 and routed, pursued by Burgundian men at arms.


 In no time at all three of the four elements of the Swiss advance guard were broken and routing.  The fourth, which had managed to break the Burgundian line was isolated and in danger of being charged from the rear by the reserve heavy cavalry.  However, the day was saved by the arrival of the rest of the Swiss army which halted the advance of the Burgundian cavalry.


Not far away from the our game were the Company of Veterans, who were putting on a brigade level  game of game  of Borodino.  This is a project I am working on, hoping to do a Shako large battles version in July.  The Company were very friendly and happy to chat about how they had constructed the scenario and the Age of Eagles rules which they used.  This photo shows the Imperial Guard


Another game which caught my eye was Chotusitz by the Ilkley Old School.  Although the terrain was basic (in keeping with Old School philosophy), the game was very eye-catching and the figures were a delight.


Altogether different was "Assault on the Mons Salient' by 'Like a Stone Wall'.  This group are well known for their demonstration games and this one was to their usual high standard.
Altogether a very good day out; an enjoyable game, a chance to chat and also add to the growing lead mountain.  The only downside was the introduction of parking charges.


Monday 14 May 2012

Aughrim

We first fought this battle well over 10 years ago and I distinctly remember what a difficult job it was for the Williamites to make any headway against what was a fairly strong defensive position.  On this occasion the dice decided I took the part of St Ruth rather than Ginkel.  When I surveyed the position from the opposite side I began to appreciate that although strong, the position did have some weaknesses, particularly on the right flank.
On the left centre, in front of the main position were placed two units of rapparees ((belonging to Hugh O'Donnel and Michael Hogan).  Their task was to hinder the advance of the attack by the English foot.


The battle started with a desultory artillery exchange, with the soft ground absorbing most of the shot.  The whole Williamite force moved forward, with the English foot and to their left the Huguenots, struggling forward across the boggy ground and the marshy stream.  The ground conditions slowed them down considerably and disordered their ranks.  The English foot then came in musket range of the Hugh O'Donnel's men.  The Irishmen's volley added to the confusion and the officers struggled to maintain order.  Another volley was fired by the Irish and to this was added fire from artillery on the ridge.  With battalions stacking up behind the 8th (Beaumont's) were ordered to clear the way. The colonel requested more time, but behind him the men of Kirke's were in no mood to stand under fire and pushed the leading battalion aside.
To their left, a second column was being led by Trelawney's (the 4th Foot) was also crossing the stream.  They were not under artillery fire and although receiving a volley from Hogan's rapparees they continued to advance, reformed and then fired a volley of their own.


 This inflicted heavy casualties on the Irishmen, who not waiting for the command, turned and ran for the security of the main defensive position.  O'Donnel's men were waiting to deliver more pain on Kirke's as they crossed the stream, but, to their left a battery of guns had moved forward and soon found the range.  As his men were killed and wounded about him, O'Donnel decided that discretion dictated he withdraw before the fury of the English reached him.
The Huguenot's were also struggling to cross the stream.  They too were under artillery fire and the lead unit of grenadiers suffered heavy casualties.  One unit strayed into a marsh and whilst trying to regain some semblance of order suffered the attention of the Jacobite gunners.
On the Jacobite left some dragoons had probed forward to cover an advance of the Williamite cavalry.  They discovered a ruined castle garrisoned by infantry and the narrow causeways covered by light artillery.  Beyond the stream lay cavalry ready to attack any units disordered by crossing the obstacles.  Ginkel, seeing the strength of the position, began to move his cavalry towards his centre.
St Ruth was content with events to his left and front, but his right was causing him some concern.  A solid phalanx of Dutch and Danish foot was approaching and in their way was a solitary unit of grenadiers.  To the right of the Dutch and Danes were cavalry and they too were looking for a crossing over the stream.


The artillery attached to the grenadiers was finding it difficult to find the range, the soft ground was absorbing shot and not allowing 'bounce through'.  As the lead units of the allied advance splashed through the stream they came within musket range and the grenadiers took to their task.  Leading the attack were the Dutch Guards and in spite of heavy casualties they crossed the stream, halted and then fired a volley which killed most of the gunners in the supporting artillery battery.  Those who survived took to their heels and left the field.  To the left of the Dutch Guards were the Danish Guards.  As they crossed the stream they were charged by the lead squadron of Sarsfield's cavalry.  This was a rash decision by Sarsfield, perhaps he thought the Danes were unformed by the stream, or the speed of the attack would reduce the effectiveness of any defensive volley.  The result was carnage.  Reserving their fire, the Danes waited until the cavalry were almost on them and then fired a volley which destroyed the front rank of horsemen and quite a few in the second.  Although leading the charge, Sarsfield managed to survive and fell back with the pitiful remnant of his command.
His involvement in the charge was to have a second serious consequence.  The colonel of the Jacobite  cavalry guarding the ford on the extreme right, saw the Sehested Cuirassier begin to cross.  Being a man of rigorous discipline he awaited the order from his commander to attack.  For his part Sarsfield expected the colonel to act on his initiative.  The result was that the cuirassier crossed the stream and reformed without interference.  Not only that, whilst the Jacobite colonel dithered, the Allied cavalry charged and caught him at the halt.  The resulting melee was a forgone conclusion.  With the advantage of weight and momentum the allied cavalry were unstoppable and totally dispersed the Jacobite cavalry.


 Taking advantage of the ground gained by the Sehested Cuirassier more allied cavalry crossed the stream.  A second Jacobite cavalry unit charged forward and did manage to stem the tide for a short time, but was eventually overwhelmed by superior numbers.  Desperately Sarsfield gathered what cavalry remained to lead a counter-charge.

Behind him St Ruth was attempting to bolster the line.  Three units of foot were taken from the reserve and moved to the right.  In addition he led his reserve cavalry, plus a unit from the left towards the area of danger.

That was the position at close of play.  Will Ginkel's left hook win the day for the Williamites, or will St Ruth save the day with his cavalry reserve?

Friday 11 May 2012

All at Sea

In March I published a post featuring some 'Fire and Steel' ships. This week we have had a re-run of the attempted break out by a Franco-Spanish fleet.  This time we used Navwar models and the rules a computer moderated version of those issued with 'Micro Fleets', published by Table Top Games.

I commanded the Franco-Spanish fleet and led the line with my frigates.  They were soon exchanging broadsides with their British opposite numbers, although they were getting the worst of it.  The second ship(La Medea) lost half of its batteries on the engaged side and the captain decided to come about to use the opposite  broadside.  This manoeuvring led to him becoming entangled with one of the British frigates, Africa, (which was larger) and a close fought boarding action began. 


 Meanwhile my lead ship (the Pomone) also turned to starboard to render assistance to his fellow captains.  This manoeuvre brought him in range of the main British ships of the line.  One of the British 1st rates, Thunderer, fired a salvo and the Pomone was reduced to a drifting wreck, sinking four moves later. My third frigate, Asia, managed to sail across the stern of the 'Macedonian' and inflict heavy damage with a raking broadside.


  However, seeing the Pomone sinking and the 'La Medea's' colours being lowered, the Asia decided to make a break for freedom.  For a time the captain thought he might succeed then a broadside from the frigate Centurion brought down two parts of the fore mast and whilst the debris was cleared the British frigate closed for the kill.  The Macedonian also moved towards the Asia and to save his crew the captain lowered his colours   

Observing the frigate melee from my flagship "Commerce de Marseilles' I decided to gain more sea room and cut across their rear.  Unfortunately, this led me straight into the main British force.  Turning to port the 'Commerce de Marseilles", 'Hoche' and 'L'Orion'' formed line and fired broadsides at their opponents.  For a time they seemed to be gaining the advantage, but the superior gunnery of the British began to tell. One broadside from Canopus eliminated half the Hoche's starboard guns. Unable to gain any more sea room and with a rocky shoal ahead, I decided that the only option was to turn away and return to port. Another victory for the Royal Navy, though I did manage to inflict some damage.
.

As an American journalist remarked following the battle of Jutland

"The German fleet has assaulted it's jailor, but it is still in jail"