Tuesday, 26 February 2013

London

Just returned from our usual half-term trip to London. One of the things we really wanted to see was the memorial to those who lost their lives serving in Bomber Command during WWII.

 I remember seeing part of the unveiling ceremony on the TV last year, but seeing the memorial 'in the flesh' really hits home.  If you haven't visited it yet, try and fit it into your next London visit.  Information about the memorial can be found here and  another site offers more photographs

Having taken part in several Colonial games a detour to the Embankment to see this statue of General Gordon seemed in order.


We also travelled to the East End to visit the V & A Museum of Childhood, which proved to be a fascinating day out.  The adults enjoyed the exhibits at least as much as the children, remembering toys from years gone by (too many years in some cases).  There were examples of Britains' soldiers  and other manufacturerers, but what really caught my eye was this photograph.  

How this took me back! It could have been me in the photograph.  Games with plastic Airfix figures and models on the living room floor. The battle ending when space was required to set the table.

Monday, 18 February 2013

Last stand at Oszyr

We have been using the 1644 rules for a good number of years and for large actions they work very well.  Their one shortcoming seems to be when small numbers of troops are involved and the result of a melee comes down to who can roll a '6' first.  So, we have concocted some 'back of an envelope' rules for such situations, which can be used within the broader context of 1644.

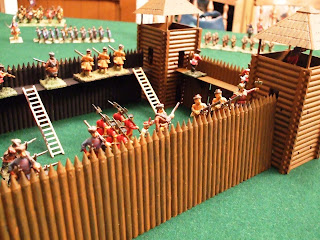
The scenario revolved around an isolated fort held by a small garrison and under attack by a besieging force. As the Polish and Cossack figures had not seen action for some time they were used for the play testing.  The fort was by Zvezda and it has been on the 'to do' painting  list for so long I can't remember where I bought it; however, it was for a project  inspired by seeing the Alexander Nevsky film. Needless to say, the figures are still in their boxes.

Provisional Rules

For shooting, defenders operate in pairs, rolling a dice as per snipers to inflict casualties.  They will require a '6' to hit and normally this would inflict a morale test on the attackers.  Fire from the defenders would be unlikely to stop an attack on its own so two '6's' are required to inflict a test.  The  attackers can fire, but require at least 11 figures in a  unit to have a chance of hitting, (again 6's required).   The defenders will have to take a command test, but no immediate negative results apply.  Before the action a 'break point' is set based on the quality of the garrison, the leadership etc.  Any failed tests build towards this break point and when it is reached the garrison surrenders.

The attackers can use scaling ladders, which the defenders can attempt to dislodge (4-6 required).  However, before this step, any supporting musketeers within close range can attempt to keep the defenders' heads down (4-6, with the 6 inflicting a casualty and a test).
Once the ladders are in place the attackers can scale them and melee the defenders at -1.  Both sides roll a d6. 
The loser by 1 is pushed back; if this is the defender this clears the space at the top of the ladder for another attacker to enter the fort; if it is the attacker then he stays on the ladder. 
The loser by 2 is wounded, he is pushed back and fights subsequent rounds of melee at -1. 
The loser by 3 is killed.

If the defender wins by 2 or 3, he can attempt to dislodge the ladder before the next round of melee.  This can be achieved by rolling a 4-6.  If he is successful a second roll is done, a 5 or 6 means the ladder is damaged and cannot be used again.  An undamaged ladder can be used to make a further attempt to scale the walls as per rules above.

Although very basic, the rules above gave us two good games.  The defence was overcome, but on both occasions the attackers lost a significant number of men.  Also the defensive fire did slow the attack of at least one column,  preventing an overwhelming co-ordinated attack.  In the first game, 3 of the 8 ladders were damaged which hindered the attack. Obviously this element of the rules can be adjusted by varying the number of ladders and/or making them more/less robust.

Here are a few photos of the game.

 The gallant Polish defenders
 Halberdiers held in reserve
The right wing of the Cossack attack moves forward

 The ladders are raised
The end is nigh, the Cossack flags fly inside the fort

Monday, 11 February 2013

Patriots and Loyalists a d20 variant

Not a very catchy title I know, but following our recent playtest we decided to go ahead with using d20s to resolve firing, melee and morale. Another innovation of Steve's was to attach labels to the units so that permanent markers could be indicated and unit morale levels tracked (these can be seen in some of the photos).

Another fictitious scenario was set up, utilising a fairly cluttered battlefield.  The terrain favoured the American troops slightly and required the British to attack.  The same brigade commanders were present and  again were of variable quality.  A roll of the dice decreed that I commanded the British and had three brigades; Archer, (rated good) on the left, Bannister in the centre (competent) and Cowman on the right (poor).  Archer had the only British cavalry unit and the best terrain to manoeuvre them.  I decided that Archer would attack towards the meeting house on the American right, supported by Bannister's artillery and grenadiers.  Bannister would hold the central hill and the adjacent wood,contesting any American advance.  Cowman was to hold his position, allow the Americans to occupy the farm and field before him, but resist any further advance. If circumstances allowed, a flank attack against an American advance was permitted.


Archer began his advance moving forward swiftly in column, however, this made a tempting target for the American artillery and one British battalion was forced to fall back to rally after suffering heavy casualties.  This persuaded Archer to form his battalions into line and although the advance was slower, it did give the British artillery time to deploy on the central hill.  The skirmishers on the American right took the opportunity to occupy the meeting house grounds and two battalions moved up to support them.  However, this proved rather a poisoned chalice, as the skirmishers then became the target for the fire of two batteries and two battalions.  Unable to stand under such a concentrated fire, they had to fall back to rally.  Although costly, their stand had allowed one of the American battalions to occupy the Meeting House itself and they would prove difficult to dislodge.


In the centre, Bannister had moved his Hessian jaeger forward into the wood to protect the artillery on the hill to their left.  Two infantry battalions supported the jaeger and these were needed as the Americans also wanted to occupy the wood.  Their riflemen advanced and began skirmishing with the Hessians.  Few casualties were caused and in an attempt to make progress, one of the British battalions moved through the Hessians and pushed back the rifles.  The retreat of the riflemen  uncovered the flank of an American battalion which was manoeuvring to attack the flank of the grenadiers.  Caught at a disadvantage, the Americans were quickly overcome and they retreated to rally.  Their supporting battalion attacked the British battalion and a confused melee resulted.  The advantage swung back and forth and in the end both units had to fall back to rally.  This confused fight resulted in the British securing the occupation of the wood, but both sides had damaged units which needed rallying.


Meanwhile, Cowmen was following orders and holding his position in front of the farm.  He had sent a flanking force, (light infantry and Hessian grenadiers) to the right to threaten the flank of the American advance.  These units began skirmishing with some American riflemen and the action lasted for the rest of the game.  The principal action was for the farm and attached field.  The Americans occupied both and found, like I had in the previous scenario that holding terrain was sometimes more difficult than attacking it.  The American unit holding the hedge struggled to stand against the fire from two units and found that it had to fall back to rally.  A second unit took the position and also found itself suffering heavy casualties.  In the farm buildings the defending unit was targeted by the British artillery and a third battalion.  It too steadily suffered casualties, eventually having to fall back.


On the British left, Archer had now advanced on the Meeting House and began a musketry duel with the occupants.  Heavily outnumbered, the American fire began to slacken and Archer judged the time right to charge the building.  The melee was fierce, both sides suffering casualties, but eventually the British prevailed.  However, they did not have long to celebrate as the American reserves fired a volley, charged and quickly expelled the British to regain possession.  On Archer's flank his cavalry was moving forward cautiously.  Suddenly, over the brow of the hill came the American cavalry.  Unslingling their carbines, the British cavalry fired a rather ragged volley, which must have surprised the Americans as they were unable to make any progress against the British cavalry.  The Americans fell back to rally, the British seized the opportunity and followed up.  Their elan proved too much for the Americans and they routed.

At this point the British held the upper hand, but we were unable to finish the game as time ran out.  The d20 experiment worked really well and we found the recording of casualties on the labels eliminated a lot of table checking.    

Monday, 4 February 2013

Vapnartak weekend

No midweek game last week as we had a full weekend of gaming organised. On Saturday it was an Indian Mutiny game in 15mm using the 'Devi's Wind' rules.  The scenario was based on the arrival of the seige train which would enable the East India Company's troops to breach the walls of Dehli.  The mutineers needed to prevent it's arrival and so launched repeated attacks against the head and flank of the approaching column. On the opposite flank attacks were made on Hindu Rao's house which was garrisoned by Ghurkas.  In the centre the Prince of Dehli, the mutineer commander used his abundant artillery to batter the defences opposite him prior to launching his own attack. Here are a few photos; firstly the beseigers' position from behind their right flank,with Hindu rao's House in the far distance

The East India Companies front line, this was destroyed by the heavy fire from the mutineer artillery

Troops from the Naval Brigade move into the marshy area on the beseigers' right to support their artillery and protect the flank of the seige train 

What the battle was all about, the head of the seige train makes it's stately progress towards the seige lines.

The mutineer left fought bravely, sending wave after wave of attacks on the relief column.  They did have some success; the gun crews shown in the photo with the Naval Brigade had to be replenished twice due to fire from the mutineers.  Also the native cavalry defeated a unit of Lancers and set off in pursuit, only to met with concentrated rifle fire from the seige lines and then overwhelmed by Company reinforcements. The battle revolved around control of the village covering the bridge which was the only route for the seige train. The relief train commander commtted his elite unit (Highland infantry) to the defence and although they suffered heavy casualties they managed to hold on.
The mutineers on the opposite flank fared little better.  Three separate attacks on Hindu Rao's House melted away before the fire of the defenders and a flanking attack by the cavalry was severely hampered by the close terrain.

Two photos of the Mutineer defences

 The Company cavalry holding off the Mutineers
 The Prince supports his troops
 Mutineer cavalry trying to work round the beseigers' flank
The battle for the vital village

The mutineers' attack in the centre was rather slow in forming up (stories later circulated that the Prince was not aware there were two gates he could use to move troops out of the city, "I have a man to look after such things" he is reported to have said.)  Anyway, by the time everything was ready,the flank attacks were petering out and when a loud cheer was heard from the seige lines signifying that the supply column had begun to arrive the Prince ordered that all forces return to the city.

This was an enjoyable game and although the rules have some shortcomings when you fight a large action with plenty of troops the minor details are not as significant.

It was an early start on the Sunday morning as the detatchment of Gentlemen Pensioners, having obtained their visas, set off over the Pennines to Yorkshire.  The Vapnartak show has become increasingly popular over the last few years and this trend continued.  We were helping out on the Lance and Longbow stand at the show and putting on Grandson as a demonstration game.  Little progress was made in the morning as most of the time we were talking to visitors about the game, which of course is what we were there for in the end.  
 The Seige of Newcastle
 Indian Mutiny
 Star Wars
 Pegasus Bridge
 Grandson
There were several large games on show,among which were the Wargames Holiday Centre with a demo game of the Indian Mutiny in 25mm and York Wargames Club with the Seige of Newcastle.  They also provided two participation games Attack on the Death Star and Pegasus Bridge. The Ilkley Lads had an 'Old School' game using the Maurice rules, a welcome alternative to games with scenery which 'overpowers' the game.  
As usual there was a strong trade presence and although I restricted myself to one pot of paint and a 25mm bridge there were plenty of customers stocking up for the coming year.
Our game was adjudged a Burgundian victory although two of the Swiss pike blocks had smashed through the Burgundian infantry.  The Burgundian gendarmes were still a potent force and threatened the flanks of the Swiss units. 

As usual a very enjoyable 'Pensioners' weekend, thanks are due to Steve and Gwen for their hospitality, Roy (Indian Mutiny) and Bob (Grandson) for organising the games.  Here's to the Pensioners AGM in June!