Thursday, 28 January 2021

Greenfield: an AWI scenario for Patriots and Loyalists

 This week's game saw a return to the other side of the Atlantic for an AWI game.  The Crown forces are pushing back the rebels, who decide to make a stand to prevent an outflanking manoeuvre.  Two rebel brigades hold a ridge position astride a vital road at Greenfield; it is the task of General Scarlet, commanding a joint force of British and German troops, to break through the opposition and advance to a position blocking the supply and communication route of the main rebel force.
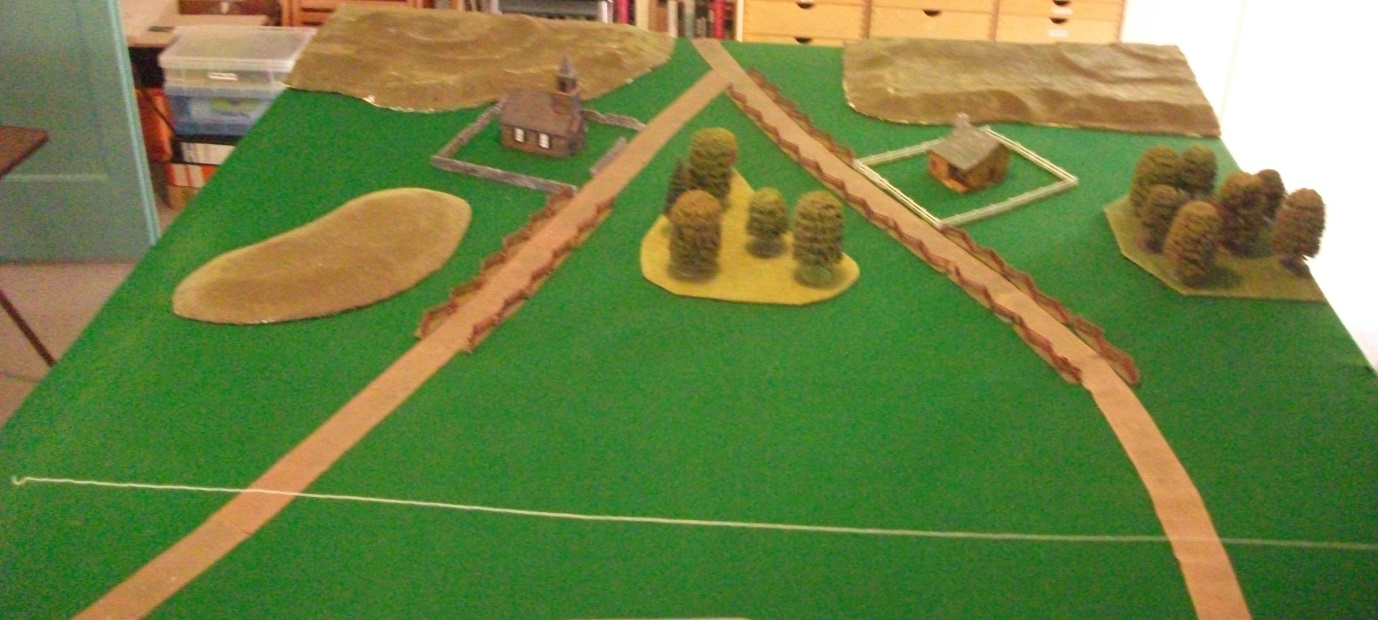
The position facing General Scarlet

Uncertain as to the strength, or exact location of the forces facing him, General Scarlet elected to concentrate his effort on the enemy right.  Experience gained in earlier actions had given him a wariness about close, wooded terrain; it was usually the location of enemy riflemen and they had exacted a high toll on his officers.  The buildings provided obvious strongpoints and the ridge good fields of fire.  However, possession of one ridge would probably encourage the enemy to fall back.  He therefore ordered Brigadier Cornwall to advance with his British brigade over the small hill on the left and then onto the ridge, before swinging right towards the road junction.  

Cornwall decided to lead the attack with his light infantry, who, once across the small hill would move right and try and secure Emmanuel Chapel.  The advance towards the ridge would continue, led  by Fraser's Highlanders supported by the grenadiers.  The two line battalions (28th and 55th)  were to engage any enemy units holding the gap between the chapel and the central wood.  In the centre, Brigadier Danzig would attempt to take the central wood with his jaegers, supported by Von Donop's musketeer battalion.  On the right, the Hessian artillery, von Mirbach's musketeer battalion and the grenadier battalion were to engage the enemy in the vicinity of Greenfield.  They were to exert sufficient pressure to prevent any rebel troops moving to reinforce the flank being attacked by Cornwall's brigade.

Brigadier Bannister places on of his militia regiments in the chapel grounds

Brigadier Able surveys his troops at Greenfield

Cornwall began his advance, but the pace was dreadfully slow, the light infantry were anything but light on their feet.  Catcalls from Fraser's  and a rebuke from Scarlet barely increased the speed of advance and by the time the light infantry crested the hill the militia defending the chapel had had plenty of time to prepare a volley of welcome.  However, the volley was not effective and a reply from the light infantry picked off a few rebel officers perhaps lowered the resolve of the defenders.  Meanwhile, the 28th and 55th had moved into position and began to fire at the militia holding the road by the chapel.  Their volleys took their toll on the militia and feeling they had done enough, they fell back behind the supporting continental infantry.

Cornwall's men move over the hill

In the centre, the wood was, as expected, held by rebel riflemen.  These were engaged by the Hessian jaeger, who continued to advance and once in close range charged.  The riflemen were caught at a disadvantage, not only having no bayonets, but also opposed by two units, as von Donop had also charged, supporting the jaeger.  In a very one-sided melee the riflemen took heavy casualties and ran for their own lines.  Von Danzig had achieved stage one of his orders, but the terrain made exploitation of his success difficult.

The Hessians drive off the riflemen

On the right, von Mirbach and the artillery were exchanging volleys with the rebel line.  In addition the Hessians were coming under fire from riflemen in the woods on the extreme left of the rebel position.  Von Danzig saw that the grenadiers would need to move further to the right to have any field of fire, so he sent orders for them to move to the other side of the road and then attack the woods, driving off the riflemen. He could really have done with von Donop's musketeers to support von Mirbach, who were beginning to suffer from the fire from two rebel units and artillery placed by the road.  However, von Donop had followed the jaeger into the woods and become disordered in the process.  There was success, the grenadiers had advanced quickly, fired a volley and were preparing to charge when they saw that the enemy riflemen had not stood their ground; they were falling back in a hurry towards Greenfield.

Cornwall was still struggling to get some impetus into his attack.  Although the militia had been driven from the chapel grounds by the Light Infantry, his opponent, Brigadier Bannister was leading another unit up to support the militia who still held the building.  The light infantry fired at the new arrivals, causing a wavering in the ranks.  With the militia halted and the regimental officers plus Bannister trying to keep them in place, the light infantry had time to fire again.  Although the militia didn't break, there was a significant casualty; Bannister was felled by one of the shots and taken from the field mortally wounded.  To their credit, his brigade continued to stand their ground, although General Browne did, on reviewing the overall situation, order the militia to fall back to the ridge.

The Continental infantry by the chapel continued their musketry duel with the 28th and 55th, both sides taking casualties.  Weight of numbers eventually told  and the Continentals broke and had to be rallied far to the rear by General Browne.

The Continentals rout under pressure from the 28th and 55th 

The militia which had previously suffered from the musketry of the 28th and 55th were now exposed to it once again.  Although they were covered by the wall of the chapel enclosure their morale was brittle and two telling volleys proved too much.  They fled, only stopping several miles to the rear. 
The militia rout
Browne was growing anxious about his right wing.  He had only 3 units left and they had all taken casualties.

On the rebel left Brigadier Able was also worried.  The riflemen ejected from the woods by the Hessian grenadiers were reluctant to return to the fray and his other rifle unit, which had been bested by the Hessian jaeger was in a parlous state.  The militia holding the road between the central wood and Greenfield was starting to show signs of breaking and his artillery were almost out of ammunition.  His fears about the militia proved all too correct as a volley from the grenadiers routed them, leaving the gun unsupported. 
Another militia unit routs

Able was fairly confident the Continental infantry in the second line would hold their ground, but he needed more pressure to be brought to bear on the Hessian infantry, to prevent them advancing any closer to the vital crossroads.  He therefore ordered the militia holding Greenfield to advance to the fences at the edge of the settlement and fire on the von Mirbach musketeers.  This they did to good effect, supported by the Continental infantry and it proved too much for the Hessians who broke and had to be rallied at the rear by von Danzig.


Brigadier Able was not allowed to bask in the glow of this success for long.  The Hessian grenadiers and artillery turned on the militia and exacted a heavy toll with their fire.  It all proved too much and the militia routed, heading for the ridge in the rear of the rebel position.  Their was a pause while von Danzig led the reformed von Mirbach back to the fight.  They and the artillery then began to concentrate on the Continental infantry who were the last major obstacle to a Hessian advance to occupy Greenfield.  Von Danzig sent orders to the grenadiers to manoeuvre to bring their fire to bear as well, but in doing this they became entangled in the woods and it proved a lengthy process to reorder their lines.

The militia abandon Greenfield

On the Crown left, Cornwall was anticipating success, all it needed was for the Highlanders to see of the wavering militia facing them and the way would be open.  Fraser's advanced, supported by the grenadiers and fired a volley at the militia.  The rebels shrugged this off and fired a volley in reply.  Several officers were struck and the attack stalled.  As uncertainty began to rise in the ranks, a second volley, this time from the chapel, hit the Highlanders in the flank.  Uncertainty turned to panic and the Highlanders ran for the rear.

Fraser's rout

At this point we ran out of time.  The rebels were awarded a narrow victory as they had held the position and denied the Crown forces the opportunity to block the rebel lines of communication and supply.  However, this had been achieved at a high cost, with most of the remaining rebel units in a parlous state.  Not that the Crown forces were unscathed, they would take time to recover.  Once again the close terrain had made manoeuvre difficult and the various 'choke points' had enabled the rebels to gain a superiority in numbers.

A most enjoyable game, many thanks to Steve for hosting it.   


Friday, 22 January 2021

Plan for the year

Uncertain as the times are, it is always best to at least make an effort to have a bit of structure to what you would like to do for the next few months.  Up to easter the main project will be the Austrian fleet for the battle of Lissa (1866).  This is my part of a joint project with Steve, who will be painting up the Italian fleet.  The ships are produced by Spithead Models and come in four batches, the first at the end of last year and the remainder at monthly intervals this year, starting this month.  They are 1:1200 scale

Here are the first squadron of gunboats, four more are nearing completion

Hum, with her sisters Vellabich and Dalmat

Steve has assembled the Italians' frigate squadron, here are two of them


The next batch are Austrian Avisos and Italian ironclads, plenty to look forward to.  

In between the ship painting and rigging I hope to plod on with the Eastern Renaissance collections, Ottomans, Poles and Cossacks in particular, though at some stage I would like to fit in a couple of units of reiter for the Muscovites.


Monday, 4 January 2021

Border patrol: an eastern renaissance scenario for Pike and Shotte

 Just before Christmas Steve and I managed to fit in a skype game.  I drew up a scenario where a unit of Muscovite border dragoons had been carrying out a patrol, watching the Cossack lands for any signs of impending raids.  Unfortunately, they strayed too close to the Cossack settlement and failing to get away, ended up in an old border fort.  A messenger had managed to get away and he roused the local provincial Muscovite forces to come to the rescue.  The Muscovite force consisted of two units of light cavalry, two of feudal cavalry, two units of urban streltsy and two of servant Cossacks. 

The initial set up of the Cossack force


Cossack force keeping an eye the fort

The Cossack commander had been told by his scouts that the Muscovites were on the way and drew up his force to cover the fort.  He had two units of Moloisty, a unit of Cossack musketeers and a small composite unit which was to keep an eye on the fort and stop the border dragoons sallying out.  In addition he had four units of light cavalry.  On the right was a unit of cavalry, the centre was held by the infantry, the musketeers between the units of moloisty.  Two cavalry units were on the left with the final unit held in reserve.  The Muscovite commander received reports of the Cossack deployment and decided to place all his cavalry on the right.  His four units of infantry were to advance and pin the Cossack foot whilst his cavalry, having the advantage of the weightier feudal cavalry would disperse the Cossack cavalry and then sweep round and envelop the Cossack line.

The Muscovite infantry prepare to advance

The Border Dragoons line the walls of the fort

The action began with the Muscovite light cavalry moving quickly forward, although the feudal cavalry were a little more cautious.  As he saw the mass of Muscovite cavalry bearing down on his left flank, the Cossack commander quickly galloped over to the right and led the unit of cavalry there across the battlefield to support the left wing.  Action was quickly joined with the Cossacks gaining the upper hand.  One unit of Muscovite light cavalry routed, the other held on, mainly because a unit of feudal cavalry  joined them in the melee.  The successful Cossack cavalry pursued their defeated opponents straight into the second unit of feudal cavalry.  In the resulting melee both sides fought themselves to a standstill and had to fall back to reform and rally. 

The Muscovites rout

One of the moloisty units had drifted across to the left, it's commander thinking its presence would support the cavalry and provide some fire support.  However, this did mean the Cossack infantry in the centre and right were now outnumbered two to one; if the Muscovite commander could organise a coordinated advance the Cossack position would be perilous.  This was proving difficult as although the streltsy were advancing steadily, the servant cossacks were far more reluctant

Cavalry action on the Cossack left

Overview of the battlefield
On the Cossack left the former right wing cavalry were now committed to the fray.  Their intervention tilted the melee in the Cossack favour once more and eventually the Miuscovite light cavalry broke, routing to the rear and pulling the feudal cavalry with them.  There was no pursuit, the Cossacks had paid a heavy price for their victory and would take time to recover.
The Cossack reinforcements arrive on the left

Towards the centre, the Cossack light cavalry resumed the attack against the feudal cavalry they had tussled with earlier.  Although they caught the Muscovites whilst they were still rallying, the Cossacks were unable to push home their advantage and ended up suffering such heavy casualties they routed to the rear.


The infantry action had now begun.  As the streltsy came in range the Cossack musketeers fired a volley which inflicted heavy casualties on the advancing Muscovites.  Undaunted, the streltsy charged, only to receive more casualties as they closed and then suffer heavily in the melee.  Even the support of their fellow streltsy unit couldn't hold them in position and they fell back in disorder.  At this point, the reserve cavalry unit which the Cossack commander had brought forward to support the infantry, now charged the hapless streltsy.  Caught at a severe disadvantage, the streltsy were overwhelmed and routed from the field.

The Cossack cavalry rout the streltsy

Meanwhile the Cossack musketeers, buoyed by their success, decided to charge the second streltsy unit. Although the Cossacks survived the closing volley, the streltsy then employed their berdische axes to good effect, inflicting heavy casualties on their assailants.  It proved too much for the musketeers and they routed, eventually being rallied close to the fort by the Cossack commander.  The moloisty unit on the right had managed to disorder one of the servant Cossack units by musketry, but a volley from the streltsy had caused them to fall back disordered.

The Cossack musketeers rout.

Surveying the field the Muscovite commander was not convinced he would manage to reach the dragoons in the fort.  Although his infantry had achieved some success, his cavalry were spent.  He ordered the advance to cease and what remained of his force to fall back to reform.  For his part, the Cossack commander assessed that his force was on the brink of defeat. Although his cavalry had the upper hand, all the units needed time to reform.  His infantry was reduced in effectiveness and may not resist another attack.  He summoned  the dragoons to surrender, offering them safe passage to their lines in return for their firearms and horses.  His offer was accepted by the dragoon commander and after the surrender both sides withdrew under cover of darkness.

An enjoyable action which could have gone either way.  The Cossack cavalry did better than expected against the feudal cavalry, but the musketeers should really have relied on their musketry rather than attack the streltsy.  Both sides struggled to coordinate their infantry due to the number of raw, militia units. 

Saturday, 19 December 2020

The Kingdom is Ours rules test

 Both Steve and I have picked up copies of these rules recently and although we are quite happy with how our in house version of Pike and Shotte works, we thought we would have a look at them to see if there were any useful mechanisms we could perhaps use.


The rules are described as fast play so we expected a fairly straightforward structure with a minimum of table checking and the quick resolution of shooting and combat.   There is quite a bit of variability built into the rules; you roll 2d6 to establish the quality of each unit, (except guns which always begin as 'good') and the required score for a particular quality varies for early war (1642/3) and late war (1644/5).  As with Pike and Shotte the ability of the commander is also diced for; the more able he is, the more commands he can issue each turn.  For our game Steve set up a simple terrain and one tercio per side; a tercio has 3 infantry units, 2 of cavalry and a gun.


The view from behind the Parliamentary lines, the objective is to control the crossroads.  Each side has a number of dice of a particular colour.  They place a total of dice into a bag or pot equal to the number of units, plus the number of dice dependent on the quality of the commander.  In addition, an extra dice of a different colour is put in the bag/pot; when this is drawn the turn ends.  Dice are drawn in turn, the colour denoting which army can try and carry out an order.  It is possible to issue up to three orders to a single unit.

Well, things started fairly slowly, the distance a unit moves is dependent on the total on a number of d6, 2 for infantry, (3 if charging), or 4 for cavalry (5 if charging).  This does lead to difficulty trying to co-ordinate an attack.  In addition, units outside the command radius of the general will need to dice to see if they receive the order, with only one commander this can lead to some units failing to move at all, as happened to us.  Once the dice to end the turn is drawn, action ceases and then the 'random events' phase starts.  A d10 is thrown for every unit in turn, plus the general, if it comes up 9 or 0 then two d10 are thrown and the total checked against an events table.  With 6 units, plus the general and a 1 in 5 chance of getting a 9 or 0, on average at least 1 of your units is going to be affected.  As you would expect some events are positive, other less so.  Ammunition, status (ordered/disordered) and position can all change.

Shooting is a two or three three stage process, establish a possible hit, does it inflict a casualty, for mixed units is it pike or shot.  It takes 4 hits to remove a base and this inflicts a morale check.  Melee is similar, establish the number of dice to be rolled, then the number of potential hits, how many count and then, for mixed units, are they pike or shot.

In three hours play we managed almost 4 turns (one of which involved only 4 or 5 units moving) and although it was a first attempt and over skype, it was hardly 'fast play'.   We felt that the influence of the  random events phase was too strong.  One turn, both commanders had to move a full move backwards, which took most of the army out of command radius.  There are quite a lot of tables to check for various phases and the playsheet runs to 5 pages in the book.  The main drawback however was the need for a 'unit tracker' for each unit.

Overall, we were not favourably impressed with the rules on this first run through.  They had some interesting ideas, for example only finding out your ammunition level after your first volley.  However, the basic things like firing and melee are 'clunky' and we felt that Pike and Shotte fitted our 'style' better.  We will try The Kingdom is Ours again, just to be fair to them, but they face an uphill struggle.


Monday, 14 December 2020

Return to the low countries

For this weeks game Steve and I returned to the Grand Alliance.  It was a fairly simple scenario with both armies trying to control an area of high ground. 


As you can see it is a symmetrical battlefield, with two low hills, a marsh and two streams issuing from the marsh.  Although the photo suggests otherwise, the two hills are equal distances from the side of the table. Crossing the stream may cause disorder (impassable to artillery) and the marsh was impassable to all troops).  The objective for both commanders was to take control of both hills.  Each force consisted of two brigades of infantry (each of 4 battalions), one brigade of horse (4 regiments) and a light gun. The forces would enter from the two short table edges and dice for point of entry, (1/2 left, 3/4 centre, 5/6 right).  For our game the dice decreed that Steve would enter from his right and I would enter from my left, ie facing each other at the top of the photo above.  

The Comte de Salle Forde commanded the French force and ordered his cavalry forward towards the stream, with his first infantry brigade, accompanied by the artillery, following slowly behind.   Graf von Grommit also advanced his cavalry, but halted short of the stream, hoping any attempt by the French cavalry to cross the stream would cause disorder and give him the advantage in a subsequent melee.  The Chevalier D'Estree commanding the French cavalry was not going to be discouraged by the stream, he ordered the leading units to charge.  Regiment Toulouse charged regiment Erbach who stood their ground and fired their pistols at the approaching French cavalry.  Toulouse managed to cross the stream without becoming disordered and crashed into their stationary opponents.  Erbach were thrown back by the impetus of the French and fell back through their supports, regiment Fugger.   Fugger managed to hold their ground against Toulouse and the melee continued.

D'Estree's cavalry attack

To the left of regiment Toulouse, regiment Talmont charged across the stream. Their opponents, the Veningen Gendarmes, having more space to manoeuvre then Erbach, counter-charged.  However, the result was still the same, the allied cavalry were thrown back by their French opponents.  Regiment Talmont now swept forward into the unit of British cavalry, which after a brief struggle, suffered the same fate as the Veningen Gendarmes and was forced to fall back.  Only the need to rally prevented Talmont from pressing home their advantage.

Talmont's successful charge

Where were the infantry?  Grommit's first brigade was slow to appear, but eventually the mixed Anglo-Danish brigade under the command of Brigadier Golz began to move forward. Golz's orders were to secure the nearest hill and his troops moved around the cavalry and headed in that direction.  Not being a native English or Danish speaker his commands were not always carried out promptly and progress was slow, especially when the success of d'Estree's cavalry forced the infantry to deploy into line ready to fire in support of their own cavalry.
                         

Brigade Golz advances

On the French side, Salle Forde's leading brigade had now reached the hill on the French side of the marsh and was beginning to deploy, any Allied troops appearing on the opposite hill would get a warm reception.  Behind them, the leading battalions of the second French brigade began to make their way towards the French left.

The French occupy one of the hills


A brief lull in the cavalry battle had taken place as both sides reformed following the earlier melees.  Erbach were the first to reform and they attacked Toulouse who were still rallying.  Now it was the French who had to fall back and Erbach pressed forward.  However, crossing the stream  disordered them and their charge lost its impetus.  The French cavalry held their ground and infantry regiment d'Humieres moved up on their flank as support and also to threaten any supporting allied cavalry with musketry.  After a prolonged struggle Erbach had to fall back.  To the left the regiment of Spanish horse in French service had charged the Veningen Gendarmes, but had been repulsed.  Regiment Talmont had attacked one of Golz's infantry battalions, but had been driven back with heavy losses.  Once again a lull occurred in the cavalry battle and the infantry now made their presence felt.

The Spanish horse driven off

Erle's regiment had now reached the top of the hill facing the French infantry and began a musketry duel with the regiments facing it.  Erle were helped by musketry from the second British battalion, but the second Danish battalion had lagged far behind and was still some way from the hill, as was the Allied artillery.  Even with the disparity of numbers the Allied infantry were managing to maintain their position, but the arrival of the second infantry brigade was becoming vital.  Von Grommit was also becoming anxious as to the whereabouts of his infantry, but thankfully the Hessian brigade at last appeared and was directed towards the right flank to counter the French move in that direction. To relieve some of the pressure on the Allied centre, Von Grommit oredered the  Veningen Gendarmes to charge the d'Humieres regiment which had crossed the stream.  The Allied cavalry charge had some success, but not enough to break their opponents and the melee continued.  Supports arrived for the beleaguered French infantry and they gradually gained the upper hand; forcing the Gendarmes to fall back.


The Veningen Gendarmes charge...


...and are repulsed

The focus of the action now switched to the French left.  Salle Forde's second infantry brigade and advanced far enough to threaten the flank of Erle's regiment.  The only unit which could offer direct support were the second unit of Danish infantry and they fired volleys at regiment Solre who  were on the left of the front line.  It was not enough to disrupt the French and four battalions (Solre, Bavaria, Languedoc and Toulouse) concentrated their fire on Erle's.  The volleys swept through the regiment's ranks inflicting horrific casualties.  No unit could be expected to stand such punishment and the surviving redcoats ran back down the hill towards their own lines.                                        

The French infantry move into position

Fire!..
Von Grommit had been leading the reformed British cavalry over to the Allied right to threaten the French flanking manoeuvre, but he found himself trying to rally both Erle's regiment and also the Danes, who, despite having had no casualties themselves had fallen back as they saw Erle's men running towards them.  The two units were blocking the way for the cavalry and also the Hessian brigade.
  
Von Grommit tries to restore some semblance of order
                                         
 Unfortunately at this point Steve and I ran out of time.  As things stood, the French were in by far the stronger position.  One hill was secured and the second was at their mercy.  The French right was looking secure and their cavalry was almost ready to resume the attack.
                                      

The closing position
                                             

Monday, 7 December 2020

Willoughby Field : a scenario for Pike and Shotte

Steve set up this scenario for our latest game.  The action takes place in the summer of 1648.  A mixed Royalist force under Sir Philip Monckton (approximately 500 strong,)had been forced to lead Pontefract as the town could not support both his troops and the Royalist garrison.  Forced to live off the land, the Royalists had moved through North Lincolnshire and eventually captured Lincoln.  There had been little resistance as Parliament had its hands full trying to suppress Royalist risings in the South East of England and South Wales.  This threat needed to be nullified and Sire Edward Rossiter was placed in command of the Parliamentary forces to defend the Midlands.  Trained troops were in short supply and all that was to hand were the locally raised cavalry who were no more than raw levies.  Gathering together what was available (c500 horse), Rossiter headed north arriving at Lincoln to find that the Royalists had already left, moving towards Gainsborough.  Here, Monckton found his progress blocked by c600 horse and dragoons from Yorkshire, so he headed back south west towards Nottingham, hoping to draw reinforcements from the Midlands Royalists. Pursued by Rossiter, Monckton decided to make a stand at Willoughby, about 6 miles from Nottingham.  Rossiter's force was all cavalry, mostly rated as raw.  Monckton had four units of commanded shot which he deployed in support of his cavalry.  A complication for the  Royalists is that they are accompanied by supply wagons which they must get off the field safely.

The starting position, Rossiter's forces nearest the camera

Rossiter needs to attack.  Inflicting heavy casualties on the Royalists would constitute a minor victory, capturing the wagons and inflicting heavy casualties a major victory.  For Monckton he needs to inflict sufficient casualties on the Parliamentarians to dissuade them from pursuing him and preserve his supply wagons.

Rossiter and Hacker ready to attack

Monckton with Byron's foot in support

As you can imagine, with all this cavalry the action was rather confused, with units attacking, falling back and rallying and then attempting to attack again.  To the left of the road, the leading units of Hacker's brigade (on the extreme left) attempted to charge the enemy.  One unit did charge, but misjudged the distance and ended up some way short of its target.  As a result it was shot at by the supporting Royalist musketeers, became disordered and was then charged  by the Royalist horse.  The unit to its right had failed their command test so did not move, but a unit in the second line was able to move forward, but not far enough to support their colleagues.  In the subsequent melee, the Royalists prevailed and the Parliamentary horse routed back, disordering their colleagues who were then hit by the pursuing Royalists.  This second unit also lost heavily and routed, leaving Rossiter to ponder whether just letting the Royalists escape may have been a better option.

First round to Monckton's horse

Rossiter's own brigade and that of White on the right had both failed to move.  White's objective was to drive off Stanhope's horse and then capture the wagons, but his failure to move was not too serious as the Royalist wagon master was slow to get his men and wagons moving.

Hacker's brigade was given a brief respite as the successful Royalist horse had suffered heavy enough casualties to prevent it charging again as it needed to rally.  Before it could do so, one of Hacker's remaining units charged and caught it at the halt. The Royalists managed to hold their ground and gave time for another of Monckton's units to add their weight to the melee.  Hacker had been allocated the reserve horse by Rossiter and he sent one of these into the melee as well.  Rossiter had decided that he needed to drive off Byron's foot to ease the way for his horse.  With no pikemen, the Royalist musketeers were vulnerable to horse, but once again not appreciating the distance to the enemy cost the Parliamentary horse dear.  As they closed the horse took a devastating volley which cooled their ardour.  Nevertheless they managed to come to blows, but they could not break the foot, both sides having to fall back to rally.  This left Rossiter's men vulnerable to a volley from the second of Byron's units which forced them back still further.

Another Royalist success

 Meanwhile, White had at last managed to get his units moving and taken on Stanhope's horse.  Like the action on the other flank, the advantage swung back and forth.  Stanhope's men got the better of the first engagement, but that unit was routed by a second of White's units.  Other units joined in, the mass of swirling horsemen meant that Stanhope's detachment of musketeers were unable to get a clear shot.  While the cavalry melee continued, the Royalist wagons had at last begun to make their ponderous progress towards the road to Loughborough.  White could see his chance of capturing the wagons disappearing and rather than commit his final unit to the melee, he sent it towards the wagons.  Fortunately for the Royalist cause, Stanhope had also retained one unit in reserve and this intercepted the Parliamentarians just as they thought they had the wagons at their mercy.  The Royalist horse saved the day, routing their opponents and removing the threat to the wagons, at least for the moment.

Rossiter was becoming concerned at his losses; already two units from Hacker's brigade had routed and now a third headed back towards Gainsborough.  To make matters worse, the pursuing Royalists had caught one of the reserve units which had failed to deploy into line after moving to the left in column.  A unit from his own brigade had routed, which meant that half his force was now hors de combat.  In addition three of the remaining units were in need of rallying.  On the other side of the hill Monckton was also concerned.  Although his men had fought well, losses had been heavy and the long-running melee which had consumed four units (two from each side) eventually ended in favour of Parliament, resulting in the Royalist participants routing.

Parliamentarian numbers at last prevail

On the Royalist left, Stanhope's force was crumbling.  Worn down by their losses, the Royalist horse were one by one routed.  Stanhope did manage to rally the units, but all were shadows of their former selves.  Fortunately the Royalist musketeers now played their part, firing volleys to rout Parliamentary units already shaken by their combat.  White's men just did not have the strength to break through the thin lines facing them to reach the wagons.

Rossiter was also beginning to accept he would not be able to drive off the forces facing him.  Even if he disposed of the cavalry, he would struggle to displace the commanded shot from behind hedges.  All he could do was to watch the battered Royalist force fall back towards Loughborough though it would be a long time before they would have the strength to take the field again. 

Monday, 30 November 2020

The Men who would be Kings; take 2

Captain Marshall took another look at the village through his binoculars.  The place seemed deserted.  Reports of it being a hotbed of the revolt would appeared to be in error, however, his orders were "destroy the village and round up any of the rascals you find".  Another quick look and then the decision.  "Elliot.  Give my regards to Captain Hughes and request that he deploy his gun to shell the village".  Marshall then sent orders to the infantry component of his small force.  It would be an enveloping attack, the Scots on the left, the East Rutlands on the right and the Blue Jackets in the centre.  All were to advance in open order, but be ready to close up if enemy forces appeared.


An overview of the table, the Imperial forces arrive on the left hand table edge.

A close up  of the village.  The counters indicate the strength points of the buildings, which can be reduced through artillery fire.

Before he set off on his task, Marshall had been 'advised' by several of his senior colleagues on the 'craftiness' of the Dervish.  "They can spring up out of nowhere" one old campaigner warned.  "Don't be caught in open order, or you will carved up like a Sunday lunch" another said.  Marshall had discussed these warnings with his infantry commanders after he had explained his plan for the attack and events would show how much notice they took.

Marshall watched his forces move forward.  The Scots made a very thorough investigation of the scrubby area to their left, which destroyed any chance of a concentric attack.  Marshall sent a courier with a terse "make haste"to hurry them along.  In the centre, the Blue Jackets made slow progress through some broken ground, but when they reached the far side they could see Dervish riflemen lining the wall of the village.  The riflemen had been firing to good effect on the East Rutlands who had made good progress on the right.  Even though the redcoats were in open order they lost over 10% of their number.  Undeterred the East Rutlands returned fire and were joined by the Blue Jackets once they cleared the broken ground.

The East Rutlands start firing at the dervish riflemen

Keen to improve the effect of his rifle fire, Lieutenant Carter ordered his men to form close order.   This did have the desired effect, but it also made the redcoats a better target.  It was just as well the Blue Jackets now joined the fray, directing their fire against the enemy riflemen.  Soon, the tribesmen's fire began to slacken as losses mounted.  More encouragement was given by Hughes' gun which had found the range and was now pummelling the village.  One building in particular was suffering and Hughes directed his men to concentrate their fire there.

Marshall's spirits began to lift, this might just work.  An aide then drew his attention to a plume of dust which was approaching the village.  Through the binoculars he saw that a significant number of horsemen were heading towards his forces.  They were not alone; more Dervish infantry appeared from the village and the surrounding broken ground.

Dervish reinforcements arrive

Neither Lennox, with the Scots or Carter with the East Rutlands, could see the approaching dervishes, but Dubney, who commanded the detachment of Blue Jackets saw the cavalry as they made their way through the village.  As they cleared the village and headed for Carter's command he ordered his men to fire at the horsemen rather than the riflemen.  A good number of saddles were emptied, but not enough to stop the horsemen and they crashed into Carter's men.  The redcoats were driven back with heavy losses.  They were saved from annihilation by Hughes, who saw the danger and targeted the horsemen as they gathered themselves for another charge and swept them away with shrapnel.  The pitiful remains of the East Rutlands made their way slowly back to camp, taking their wounded with them.  However, the gunners paid a high price for their work.  A unit of Dervishes had made their way through some broken ground and now charged.  They totally overwhelmed the gun crew and cut them down.

The end for Hughes and his gallant men

 On the Imperial left, Lennox was about to make for the village when he saw two bands of Dervish heading his way.  His men formed line and began firing volleys which scythed through the ranks of the leading unit.  Weakened, their attack was easily dealt with, but the second unit was still at full strength and when it crashed into the Scots, and their line wavered.   Eventually, they managed to drive off their assailants, but it had cost them half their strength.  Both sides now paused to regroup.  The Dervish then charged again and almost wiped out the Scots who were now too few to form close order.

Lennox's command fight for their lives

 Dubney would have come to Lennox's aid, but he was having to fend off the dervishes who had overrun Hughes.  The Blue Jackets managed to stop the Dervish advance with a well-aimed volley, but they were still being sniped at by the few remaining riflemen in the village.

Dubney's Blue Jackets keep the Dervish at bay

The game ended at this point (after the allotted 12 turns).  It was a clear Dervish victory, 10 points to 3, the Imperials getting 3 points for demolishing one house in the village.  The butcher's bill for the Imperials was horrendous.  Only 9 of the 36 infantry survived (2/3rds of those being the Blue Jackets) and none of the artillery.  The Dervish also had heavy losses, but only lost one unit, the cavalry.

Steve and I discussed the game afterwards and identified the need for the Imperial troops to find a position with a clear field of fire, preferably on a hill and force the enemy to attack them there.  Also don't form up too soon and make yourself a good target for the Dervish riflemen.