Sunday, 28 July 2019

A further Eastern Renaissance scenario

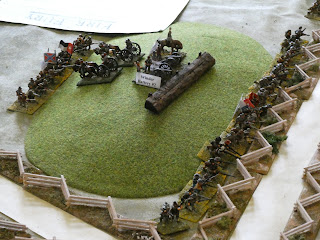
This week we are in eastern Europe again, with Steve's Muscovites facing my Polish army.  A few months ago, the Muscovites began building a redoubt to cover a vital border river crossing.  The local Polish forces crossed the river and demolished the part completed work.  Undeterred, the Muscovites returned with a much larger force and began construction again, expanding the project to include a second redoubt on a nearby hill. With the first redoubt built, the workers have now moved to start work on the second.  Behind the hills are two camps, one for the infantry and one for the cavalry.  Within the infantry camp is the large gun which will be installed in the new redoubt and also a gulay gorod. Two units of light cavalry skirmishers are deployed forward watching for Polish forces attempting to cross the ford.

The Muscovite feudal cavalry
Heading towards the ford is a Polish force consisting of 1 unit of Hussaria, 1 unit of Cossack skirmishing light cavalry and 4 units of pancerni.  Accompanying them are a brigade of infantry, 2 units of haiduks, 1 unit of levy and 1 'German' regiment (mixed pike and shot), together with a light gun.


The Muscovite deployment, showing the newly constructed redoubt with chevaux-de-frise in front of it.
The Polish vanguard deployed
Victory conditions are simple, the Poles need to destroy the Muscovite works, the Muscovites to prevent this.

Taking advantage of an early morning mist the Polish Cossacks and Hussaria have crossed the ford and deployed before the Muscovite skirmishers are aware they are there.  Behind the Polish vanguard the remaining pancerni are waiting to cross.

The Polish vanguard prepare to advance
Wasting no time, the Cossacks charge the opposing skirmishers, who released some arrows and then fell back behind the supporting unit.  Uncharacteristically, the Hussars declined to move forward to support the Cossacks. (Sulking because they had not been given the lead?).  This prevented further units crossing the river, the first of several delays which hampered the Polish advance.

The Muscovite skirmishing cavalry charged the Cossacks and perhaps re-organising after their advance the Cossacks were caught at the halt.  In no time they were falling back on their supports and, on being charged and bested in melee again, routed through the Hussars and pancerni; last being seen disappearing into the distance across the steppe.    The Hussars were also swept back over the river, an ignominious start to the battle for these elite troops.

The first Polish advance repulsed
Luckily for Polish hopes, the brigade commander rallied them and then personally led them back over the ford.  Swiftly deploying into line, the Hussars swept forward, totally overwhelming the Muscovite skirmishers and routing them.   By now the Muscovite feudal cavalry had advanced and the leading unit charged the Hussars.  Ignoring the difference in numbers, the Hussars counter-charged and defeated their opponents, sweeping forward to drive back a second unit of feudal cavalry.

The feudal cavalry defeated
The Muscovite infantry, artillery and Gulay Gorod had moved forward on the Muscovite left, though the latter had been rather slow.  This had delayed the Soldatski and a unit of Streltsy, but the remainder of the infantry had moved up to the new redoubt and then seeing no Polish infantry, forward to the chevaux-de-frise.  Behind them, the Gulay Gorod had eventually sorted itself out and  deployed to cover the flank of  infantry.  The Polish commander's decision to push all his cavalry forward before sending the infantry against the redoubt proved to be a big error.  The Streltsy were able to fire  into the flank of the Pancerni as they advanced, inflicting losses which reduced their effectiveness in the combat against the Muscovite cavalry.  Even so, the skirmishers were pushed back once again and the feudal cavalry came under renewed pressure.  One of the Pancerni units charged the Soldatski.  Although hard pressed the Soldatski stood their ground and after a tough struggle beat back the Polish horsemen. 

The Streltsy advance from the redoubt

The Soldatski defeat an attack by Pancerni

The Gulay Gorod in position
The delayed Polish infantry eventually crossed the ford and moved towards the redoubt; the two haiduk regiments in the front and the levy following on behind.  The heavy gun had now reached the redoubt and the artillery crew readied it for use.  However, they could not fire because the wagon with the ammunition was still struggling up the hill.

As the haiduk regiments closed on the chevaux-de-frise the Streltsy opened fire.  Halting, the haiduk replied and volleys were exchanged for some time. One of the Streltsy units was forced to fall back to reform, but all this did was to give the heavy artillery, (now supplied with ammunition), a clear field of fire.  Under artillery fire from the redoubt and also long distance fire from the light artillery with the Gulay Gorod, the haiduk units wilted.  Eventually, they had to retire due to their losses.  This left the levy and although they managed to fire a volley which rocked the Streltsy facing them, they were too weak to push home their advantage.

On the Muscovite right the cavalry melees continued, sweeping back and forth as the advantage shifted.  Eventually the superior numbers of the Muscovites prevailed, aided by the flanking fire from their infantry.  One by one the Pancerni units were pushed back and inevitably their losses ended in rout.  The Hussaria tried to stand against the tide, but even they had to fall back.

The rout of the haiduks 

The Pancerni are driven back
  Sensing that he could not carry out his orders, the Polish commander ordered a retreat; his rearguard covering the ford to dissuade the Muscovites from following up.

Saturday, 20 July 2019

Ober Glaz, April 1813 : a Shako scenario

Our game last week was set in Germany early in the decisive 1813 campaign.  To reflect the situation at this time both forces were entirely of 2nd rate troops and some of the units were under strength, particularly the French cavalry.

The map above shows the layout of the table.  Marchand, the French commander has a division of 12 battalions, 2 units of skirmishers and a battery of guns.  A provisional light cavalry brigade of 3 under strength units is attached.  His task is to deliver supplies to Marshal Davout in Hamburg and Ober Glaz is the next staging post on that journey.  The wagons need to keep to the road and cross the river by the bridge.  If the fords have to be used there is a risk that wagons could be damaged and the supplies lost.

View down the table
A Prussian force commanded by General Puttlitz is in the area and consists of 10 infantry battalions, a unit of skirmishers and a gun battery.  Attached is a light cavalry brigade of two full strength cavalry units.  Puttlitz's orders are to prevent the supplies getting through and inflict as many casualties as he can on the French force.

For this game we ignored the purely supervisory role of the C in C and had, in effect two divisional commanders a side.  This allowed a greater dispersion of forces and also the splitting of the division into 2 brigades.  Also, the divisional commanders could help units recover from  'staggered' and 'fall back'.  Another change was to use average dice for the melees, reducing the chances of one side being wiped out in the first round. This, together with our local 'house' rule of rolling for the victor of the melee to roll for a casualty should result in more even combat. 

The French deploy first within their zone and then Marchand rolls a d 6.  With a 1 or 6 the Prussians arrive at A; 2 or 3 position B and 4 or 5 position C.  This enabled us to run the scenario through twice and have two very different games.

A roll of the dice allocated the French to Steve and he deployed his troops.  His roll for my arrival was a '1' and so the Prussians came on behind the Schlossberg.

The Prussian left wing
The French cavalry were well forward and I thought it may be possible to swing round behind their infantry and attack the wagons with my cavalry, whilst my infantry attacked the flank.  As with many plans this one did not survive first contact with the enemy.  My right wing was attacked by the French cavalry, the artillery spurning the chance to fire canister into the horsemen before they charged.  The Silesian Militia failed to form square and were destroyed in short order by the 2eme Hussars, who then charged my artillery.  Fortune favoured the gunners. Against the odds they drove off the Hussars, but once again failed to hit the target when firing canister at the Lancers.  The Lancers duly charged the artillery but unbelievably the gunners prevailed again!

The Silesian Militia caught in column

The Prussian gunners survive the French cavalry attack
My own cavalry attack was progressing reasonably well, though the Frei Korps cavalry had suffered losses from long range French artillery.  French battalions had formed square against possible attack and my battalions moved forward.  However, they were not quite fast enough, for as my cavalry continued their manoeuvre the threat of a charge receded and the French were able to form line and begin to exchange volleys with the Prussians.

By now Steve had decided to leave one brigade of his division as a rearguard and cover the continuing advance of the wagons with the other.  The firefight between the rearguard and my attacking battalions went in the French favour, with most of my units staggered by the French volleys.  My cavalry had eventually reached a position behind the rearguard but found themselves facing the reformed French cavalry.  Ironically their fallback from the failed charges on my artillery had placed them nearer my flanking manoeuvre and in a position to block any attack on the wagons.
Just before they charged my Frei Korps cavalry were shattered by a volley from the 1st Naval Infantry.  The landwehr cavalry continued their charge but were driven from the field by the 1eme Chasseurs a Cheval.

Confused fighting between the rearguard and the Prussian infantry
There was now no chance of intercepting the wagons and with over 30% losses in my infantry little chance of inflicting much damage on the rearguard.  A decisive French victory,

After lunch we set up the scenario again and changed sides.  For the second game the Prussians were in position C, blocking the route into Ober Glaz.  Steve had concentrated his cavalry on his left and so I manoeuvred the French cavalry to face them.  I decided to try and outflank him on his right and sent 6 battalions against that flank.  These suffered quite heavy casualties from the Prussian artillery but continued forward.  The remaining battalions were to try and pin the Prussian centre and prevent reinforcements moving to their threatened flank.

The French attack
On my right the Prussian cavalry played a waiting game, hoping to entice the French forward into musketry range of the supporting infantry.  The French eventually charged and drove back the Landwehr cavalry, but the supporting 2eme Hussars were wiped out by musketry volleys.  Following up the Lancers charged the Frei Korps and pushed them back too.  However, the Lancers had suffered heavy casualties in these melees and as they tried to reform they were swept by volleys fro the Frei Korps infantry and destroyed as a fighting force.  This left only the Chasseurs a Cheval and they fell back to cover the French flank.

The French flank attack goes forward

The cavalry melee on the Prussian left
In the centre the 4th battalion of the 23rd line had managed to drive back the 9th Reserve Infantry, but the centre was very thin and the wagons were vulnerable to a determined counter attack.  On the Prussian right the hill was lost, the heights having been taken by the 3rd battalion of the 10th line.  Steve was drawing back units to form a line defending the bridge and therefore blocking the road to Ober Glaz.

It was a Prussian victory, the supplies would be delayed and the French infantry losses were in the region of 25%.

Sunday, 14 July 2019

Gentleman Pensioners AGM game

The Sunday following the Phalanx show at St Helens the Gentleman Pensioners gather for a game at Steve's.  This year Dave provided an ACW "Fire and Fury" game based loosely on the battle of Gaines Mill.


A view from behind the Federal deployment area; the Federal objective is to silence the guns commanding the river.  The guns are sited just left of the town at the top of the photograph.  Commands were allocated by lot and I received McCall's Division.  The Federal generals went away to plan their attack based on the table as we last saw it.  When we returned we found that the Confederate troops had been very busy constructing defensive works, making our task that much harder.  Our plan was for me to enter by the road on the left between the two woods and advance towards the town.  John, with Morell's division was to advance straight up the road from the bottom left and seize the road junction.  Chris, with Sykes' division was to advance down the right, cross the river and then attack the town.  Phil, the commanding general, would use Richardson's cavalry division to support Chris and John; he also held the reserve infantry divisions of Slocum and Roberts, which he would allocate as the battle unfolded.


A view of the town.  The Confederate battery was placed on the hill just above the landing stage.  Confederate reinforcements later arrived by train along the line just above the hill.

As my troops entered the table they found A P Hill's division waiting for them.  The Confederates had opted for a defence in depth, with a forward line to disrupt our attack and a main defensive line behind entrenchments.  I sent one brigade into the wood on my left and tried to push forward towards the town supported by my artillery.  There was very little space but eventually I was able to make some progress, mainly because Ian, (A P Hill) obligingly began to fall back towards the entrenchments.

John was having real problems as he pushed forward.  The Confederate cavalry had deployed in the town and wood astride his line of advance and were taking full advantage of his brigades in road column.  Fortunately, the Union cavalry attacked the Confederate positions and began to push them back.  Meanwhile, on the Union right Chris was having problems getting his men across the river, the ford being within range of the Confederate artillery.  As this was on the far side of the table I have only a hazy idea of events,  For more detail see Sediment's blog

McCall's division deploys
Confederate forward defence line with the entranchments further back

Morell's division advances, menaced by the Confederate cavalry
In the centre of the Confederate forward line was a hill and  A P Hill had deployed his artillery on it.  This was able to fire with some effect on Morell's division as the brigades pushed on towards the cross roads.   After one particularly devastating salvo the guns had to fall back to replenish their ammunition allowing some respite for the Union infantry and leaving this important point vacant.


Morell's division continued to push up the road, but a hard fought struggle was taking place between elements of the two cavalry divisions.  Eventually the Union gained the upper hand, taking control of the wood and village, but the Confederates had achieved their aim of delaying the Union attack on the main position.  Indeed, they launched further 'spoiling attacks against Morell's infantry destroying any cohesive advance.

The battle for the village

The Confederate cavalry charging home
My division was making some progress, slow, but steady.  Each time I thought I had a chance of catching the Confederate brigade falling back through the wood it managed to fall back further.  Phil allocated the two reserve divisions to my flank and with those extra troops I pushed forward more strongly.  The central hill was abandoned by the Confederates and the defenders made for the entrenchments.  One brigade was caught and almost destroyed, as was one battery, but the bulk of A P Hill's command manned the works.

The central hill captured, Union cavalry to the fore

Union brigades pushing forward

The main Confederate defences, as yet untested
After a full day's gaming there was still a lot of play left in the scenario, but unfortunately, time ran out.  Everyone enjoyed the game, though our previous contact with the rules was minimal.  Dave's scenario was nicely planned, it just needed more time to reach a conclusion.

Thanks to Dave and Steve for umpiring, Will, Andy and Ian for providing tough opposition and Phil, Chris and John my fellow commanders. 

Monday, 8 July 2019

Phoenix 2019

Rather a delayed post as our broadband has been glacially slow for the last month, preventing me from uploading photographs.  The last weekend in June Steve and I attended the Phoenix show at Rheged near Penrith.  As last year, we were joined by Alasdair, the third member of our group, who moved up to Scotland some years ago and journeys south for the weekend.  The show seemed quite busy and there were a good number of traders attending.  The emphasis was on participation games, but this large SYW in India game did have a good selection of well-painted figures


This ACW participation game was very well presented


These fantasy/role playing games also attracted quite a bit of interest


Nice use of card buildings and scenery


None of us purchased much, my 'haul' consisted of bases and some acrylic varnish, but those who were hosting games were happy to chat and we also met some friends.  A splendid weekend which Steve and I extended to include a walk from Stonethwaite in Borrowdale over High Raise to the Sticklebarn pub in Langdale.

If the internet holds up I will try to post a report on the Gentlemen Pensioners' Sunday game, which followed this year's Phalanx show and also the games that Steve and I have been having over the last month or so.